
I’ve come to a realization, and I’ve a confession to make—I’m a litterer. A ring litterer, that’s. Ever since I began sporting stacking rings, they’re scattered throughout my home.
I believed it is perhaps a good suggestion to maintain some ring dishes all through the home, and what’s a straightforward and low-cost approach to make a hoop dish? Out of clay, after all!
")
Right here’s a fast video tutorial to make your individual marbled clay ring dishes, or preserve scrolling to see the textual content and picture tutorial:
Provides:
– oven-bake clay (white, grey, black, and the colour of your selection)
*a number of ounces of coloured clay and the 1.75 pound white clay will make a number of dishes!
–X-Acto knife or plastic clay knife
-small bowl or baking ramekin (make certain they’re oven secure)
–gold paint and small paintbrush
–silicone rolling pin or massive spherical jar
-large can or jar to hint round
–glaze to seal the dish (optionally available)
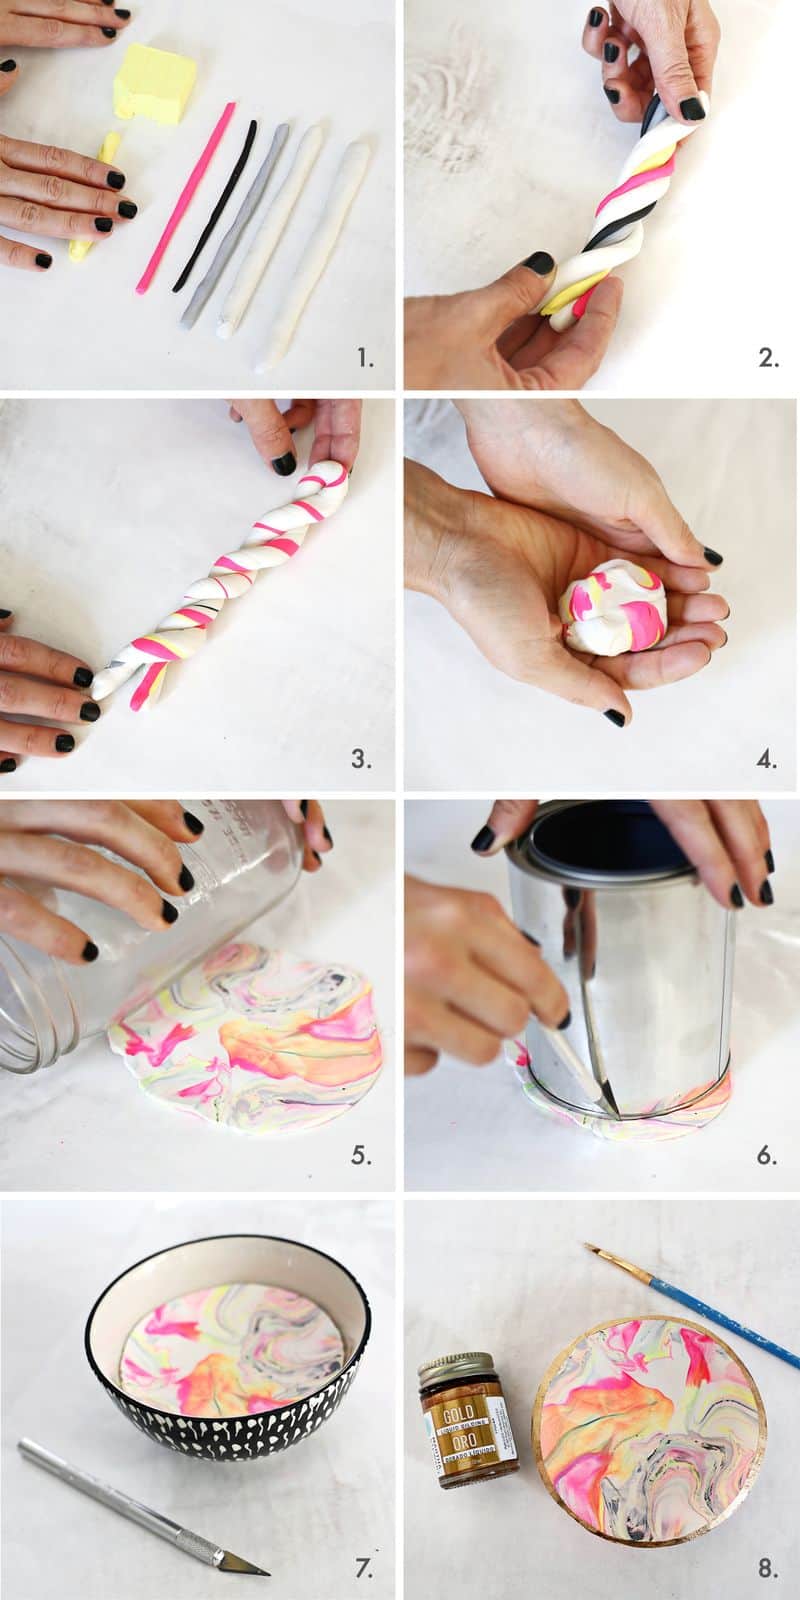
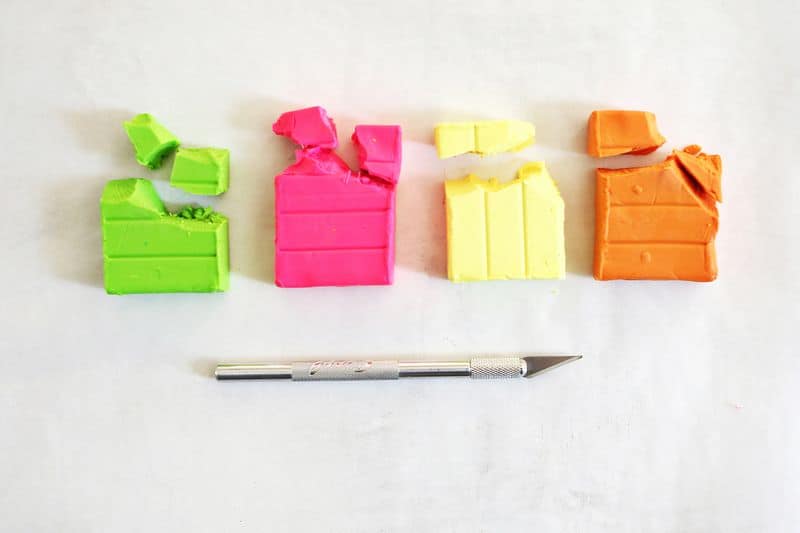
1. Roll every colour of clay that you simply need to use right into a snake (about 5″ lengthy). I normally make two bigger rolls of white, a medium roll of gray, a small roll of any colour I’m utilizing, after which an additional small roll of black.
You mainly need sufficient complete clay to roll out a 6″ circle, however don’t fear about getting the precise quantity of 1 colour or one other. Even if you happen to use the identical recipe each time, every dish will look totally different.
2. Mix the smaller rolls into one huge roll and twist collectively.
3. Roll the big twist right into a snake (about twice the unique size) to mix the colours. Twist the ends reverse methods after each few motions to provide the colours extra of a sweet cane look.
As soon as it’s twice the size, fold the snake in half and twist the 2 ends collectively, as pictured above. Repeat the rolling, folding, twisting, and rolling once more course of 2-3 instances.
4. Smoosh all of the clay right into a ball. You need to see most of your colours on the floor of the ball, so pull the ball in half and re-smoosh collectively if you happen to don’t.
5. Use a silicone rolling pin or glass jar to roll out your marbled ball. I like to make use of a glass jar so I can see what is occurring as I roll tougher or softer over sure colours.
The colours ought to mix collectively and create a marbled sample as you roll over it. Strive rolling totally different instructions, from the sting, from the middle, and many others., to push the clay from totally different angles. Roll to 1/4″ thick.
6. Use a spherical merchandise about 6″ vast as a template and lower out your dish circle with an X-Acto or clay knife.
7. Place your circle gently into an oven-safe bowl or ramekin that may be a little smaller than your circle so it can sag just a little within the heart and provide you with extra of a dish form. Bake the bowl in accordance with the temperature on the clay bundle (mine was quarter-hour at 275°F).
Take away the bowl from the oven and permit the clay to chill earlier than turning the bigger bowl the wrong way up and tapping flippantly till the clay dish falls out.
8. As soon as the clay is totally cool, use a small brush to color the rim of the dish and permit the paint to dry. Seal the dish with a glaze if you happen to want.
The glaze gained’t make the merchandise meals secure or completely waterproof, but it surely will provide you with a shiny end if that’s what you’re into!
Since you might be working with oven-bake clay, the dish will nonetheless be a tiny bit versatile when cooled and really feel extra like exhausting rubber than porcelain, however that’s OK!
It ought to nonetheless preserve its form completely superb and maintain your rings like a champ.
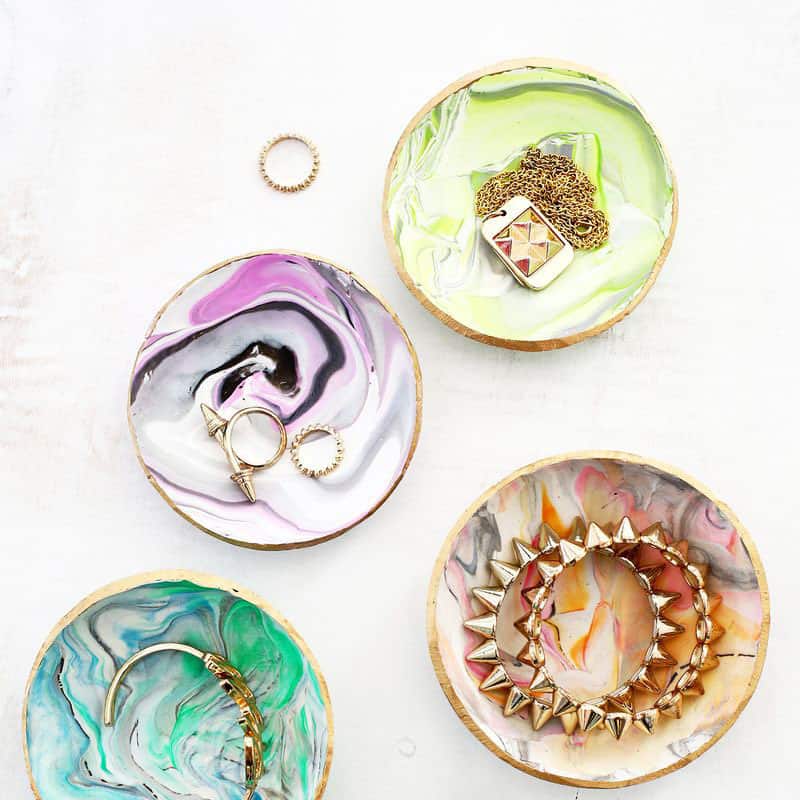
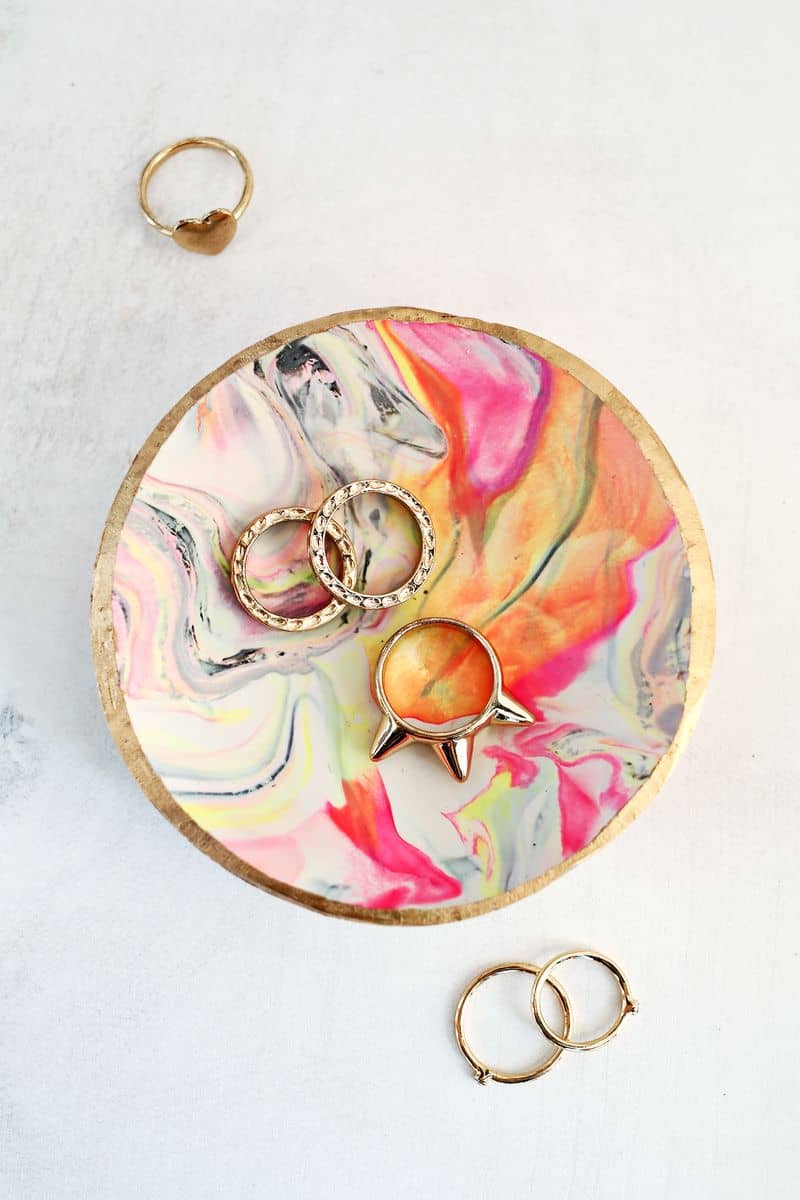
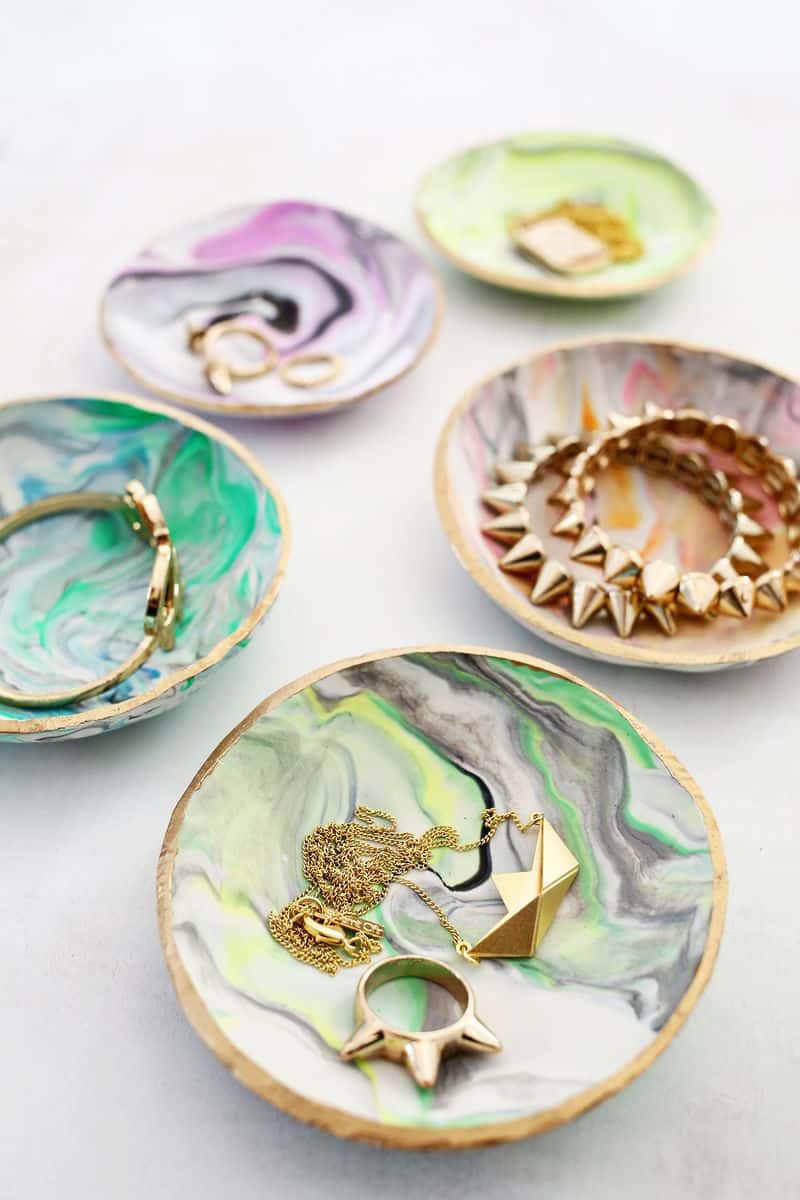
Whereas the colour mixtures are countless, my favorites have been made with white, gray, black, and two vibrant colours that make a reasonably third colour when blended.
I’d positively counsel utilizing a oven-bake clay like Sculpey that’s already tender to begin with. It’ll prevent lots of time and finger power.
In the event you don’t really feel such as you’re the DIY kind, you possibly can nonetheless snag a handmade ring dish, however these bowls turned out even higher than I hoped they might!
And you’ll see I used to be in a position to make fairly a number of of them, so I’ll positively be giving a number of away as presents. How candy would one in every of these be as a gift with a cute ring already in it? xo. Laura
P.S. Click here to see extra of our favorite DIY projects that use clay!
Marbled Clay Ring Dish
easy methods to use oven-bake clay to create marbled ring dishes
-
3+
oven-bake clay
white, black, and the colour of your selection -
gold liquid gilding paint and brush
optional -
glaze to seal dish
optional
-
Roll each color of clay that you want to use into a snake about 5″ long. I usually make two larger rolls of white, a medium roll of grey, a small roll of any color I am using, and then an extra small roll of black.
I don’t have exact clay measurements for you (and most people don’t have a scale to weigh exact ounces of clay anyway), so just use the photo as a guide.
You basically want enough total clay to roll out a 6″ circle, but don’t worry about getting the exact amount of one color or another. Even if you use the same recipe every time, each dish will look different.
-
Combine the smaller rolls into one big roll and twist together.
-
Roll the large twist into a snake about twice the original length to combine the colors. Twist the ends opposite ways after every few motions to give the colors more of a candy cane look.
Once it’s twice the length, fold the snake in half and twist the two ends together, as pictured above. Repeat the rolling, folding, twisting, and rolling again process 2-3 times.
-
Smoosh all the clay into a ball. You want to see most of your colors on the surface of the ball, so pull the ball in half and re-smoosh together if you don’t.
-
Use a rolling pin or glass jar to roll out your marbled ball. I like to use a glass jar so I can see what is happening as I roll harder or softer over certain colors.
The colors should blend together and create a marbled pattern as you roll over it. Try rolling different directions, from the edge, from the center, etc., to push the clay from different angles. Roll to 1/4″ thick.
-
Use a round item about 6″ wide as a template and cut out your dish circle with an X-Acto or clay knife.
-
Place your circle gently into a oven-safe bowl or ramekin that is a little smaller than your circle so it will sag a little in the center and give you more of a dish shape. Bake the bowl according to the temperature on the clay package (mine was 15 minutes at 275°F).
Remove the bowl from the oven and allow the clay to cool before turning the larger bowl upside down and tapping lightly until the clay dish falls out.
-
Once the clay is completely cool, use a small brush to paint the rim of the dish and allow the paint to dry.
Seal the dish with a glaze if you desire. The glaze won’t make the item food safe or totally waterproof, but it will give you a glossy finish. This is just an optional step.
P.S. Check out more cute jewelry and home decor on our wishlist and shopping pages!
Credit // Creator: Laura Gummerman. Images: Laura Gummerman and Sarah Rhodes.


