
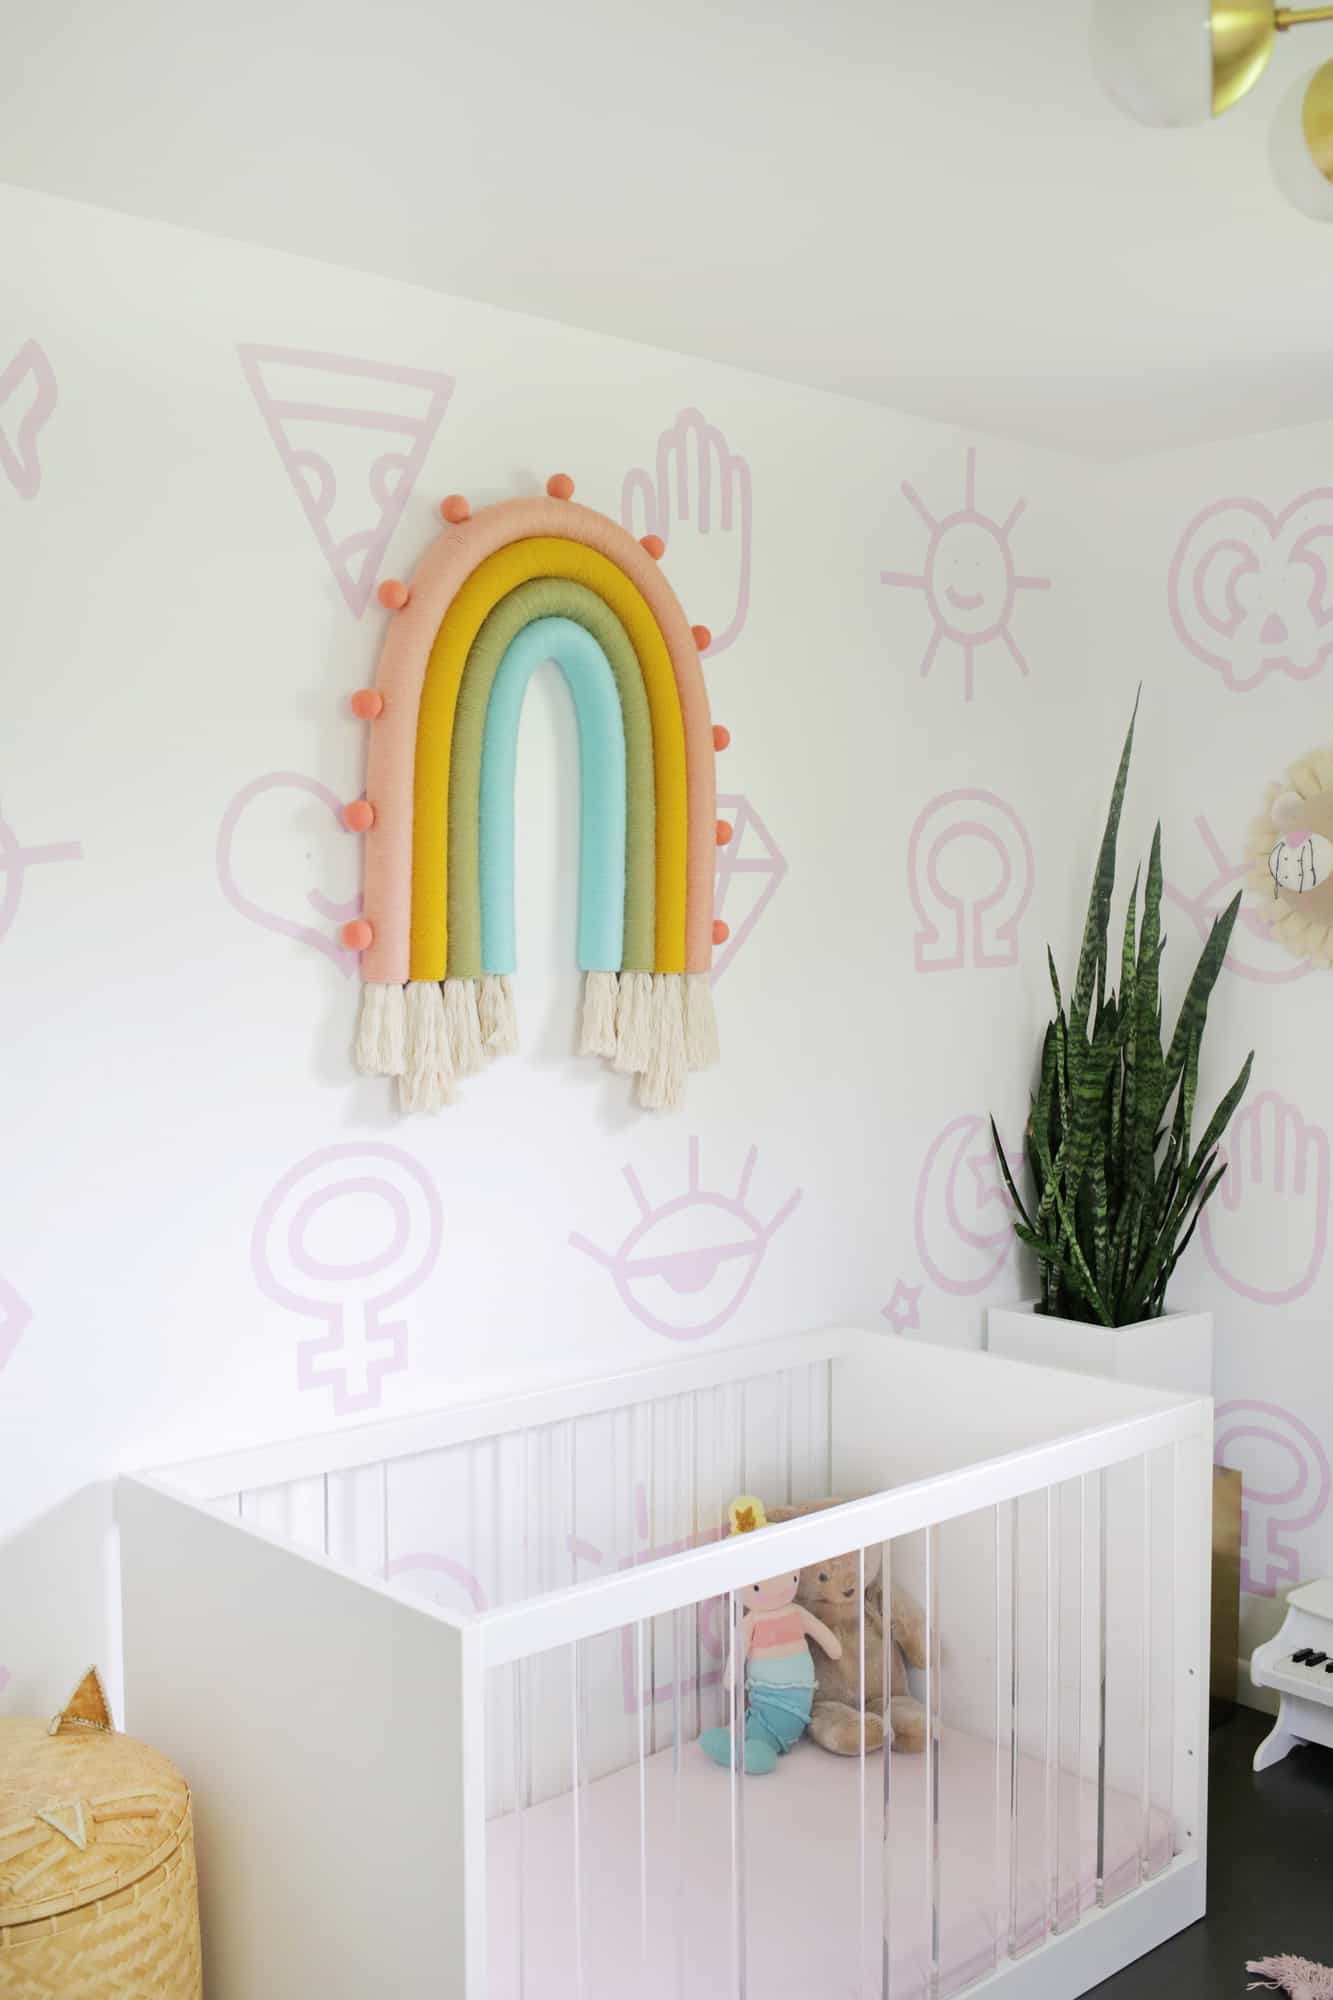
I’m so excited to share this tremendous enjoyable and amazingly cute rainbow wall hanging DIY with you right now!
I really like all of the little child rainbows which have been making the rounds these days whether or not that be on clothes, plush gadgets, or wall decor, and I additional love the little rope rainbow trend.
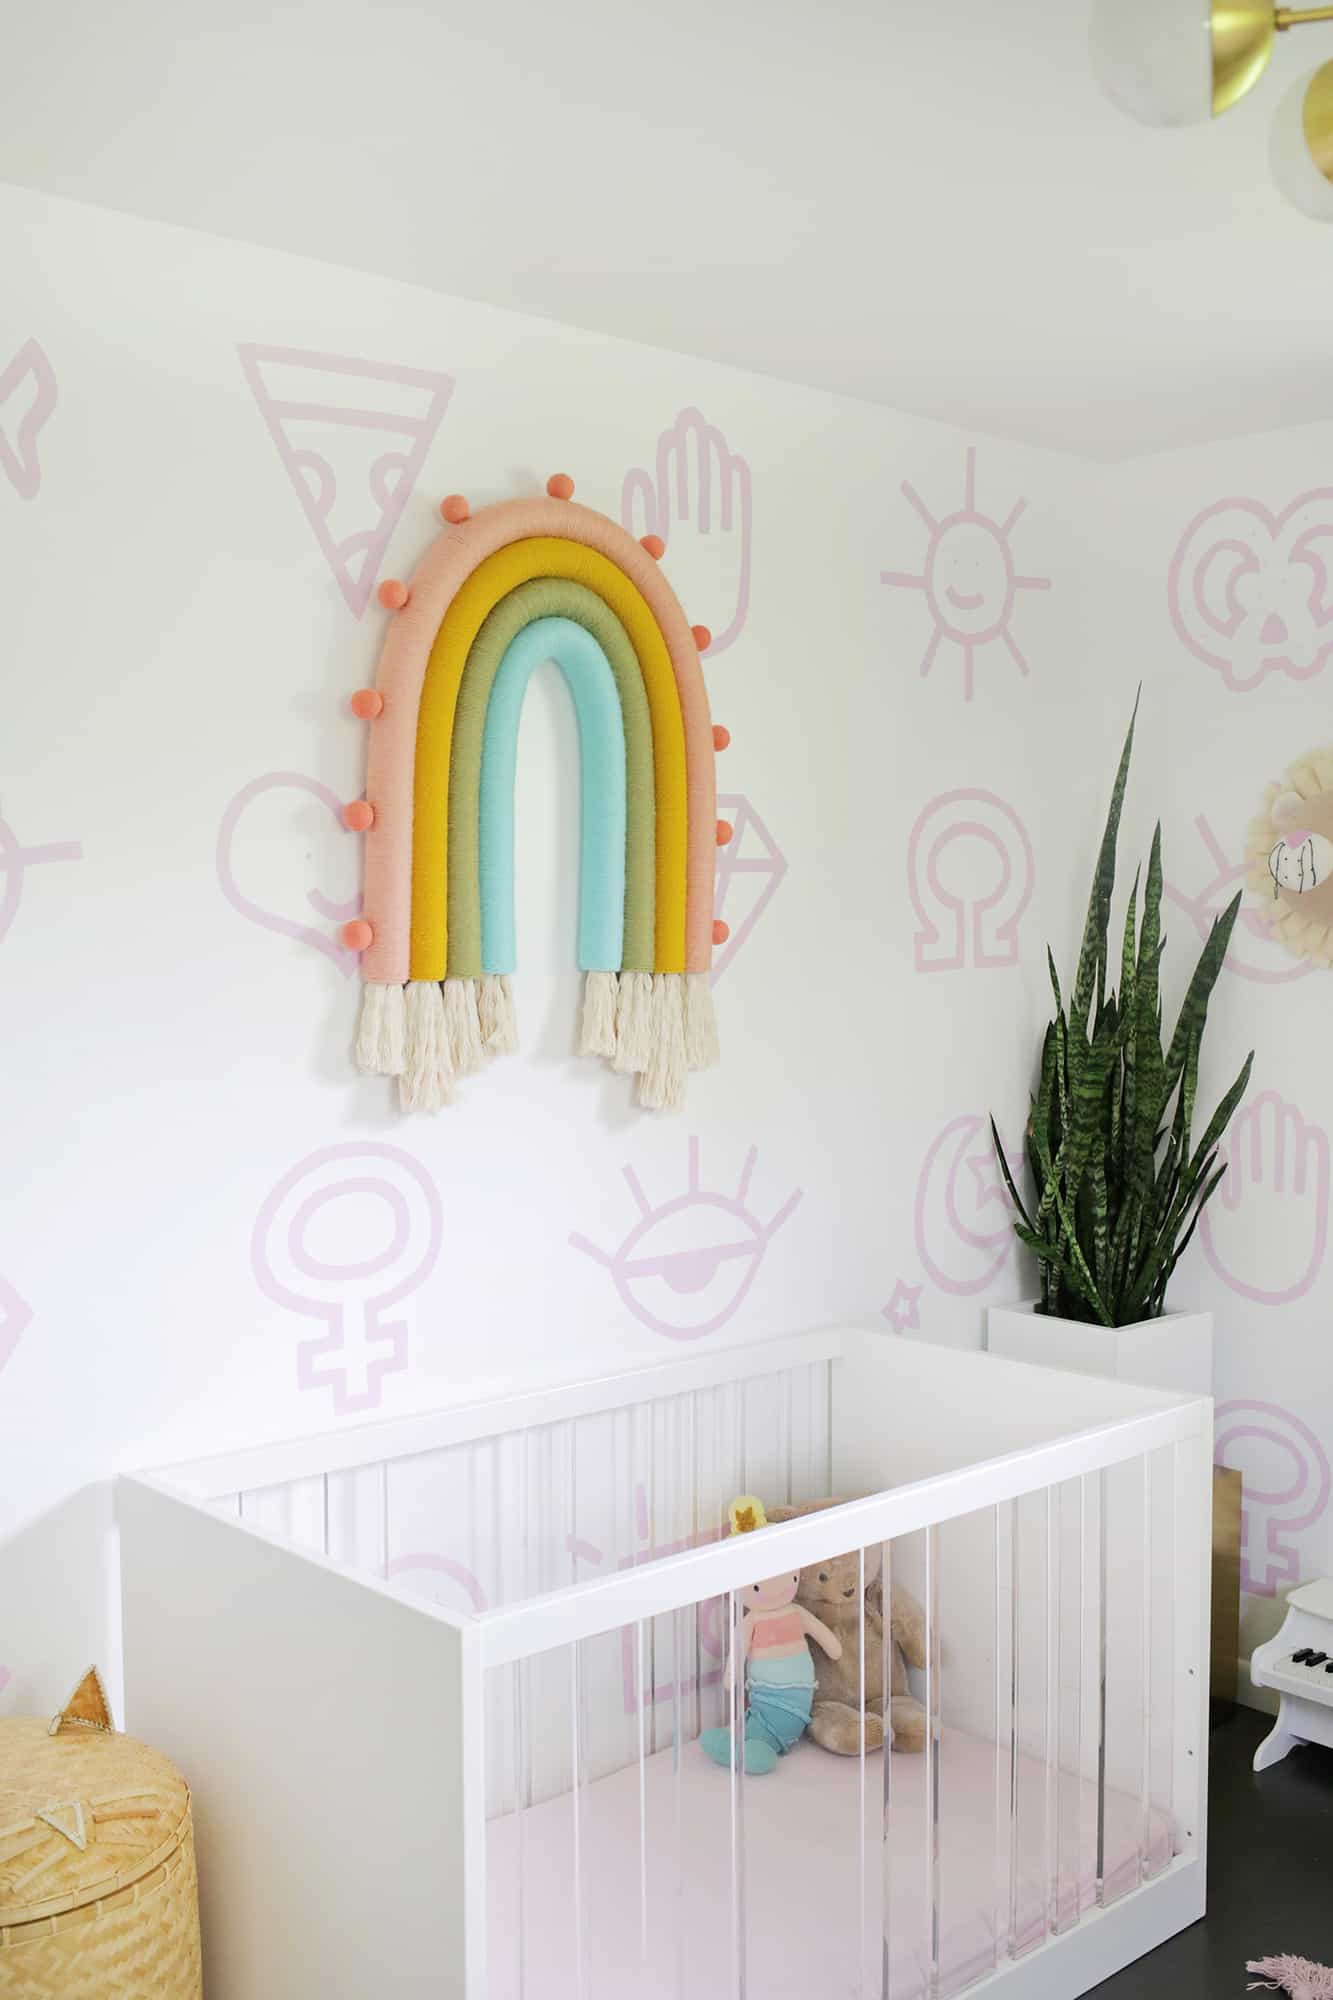
I are inclined to take every thing that’s enjoyable and make it outsized, and I used to be fairly optimistic {that a} rope rainbow can be superb on a big scale, and it seems I used to be proper!!
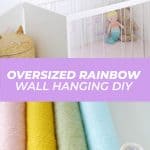
Are you able to guess what I used as a base to make this outsized rainbow wall hanging? I’ll offer you a touch … splish, splash!
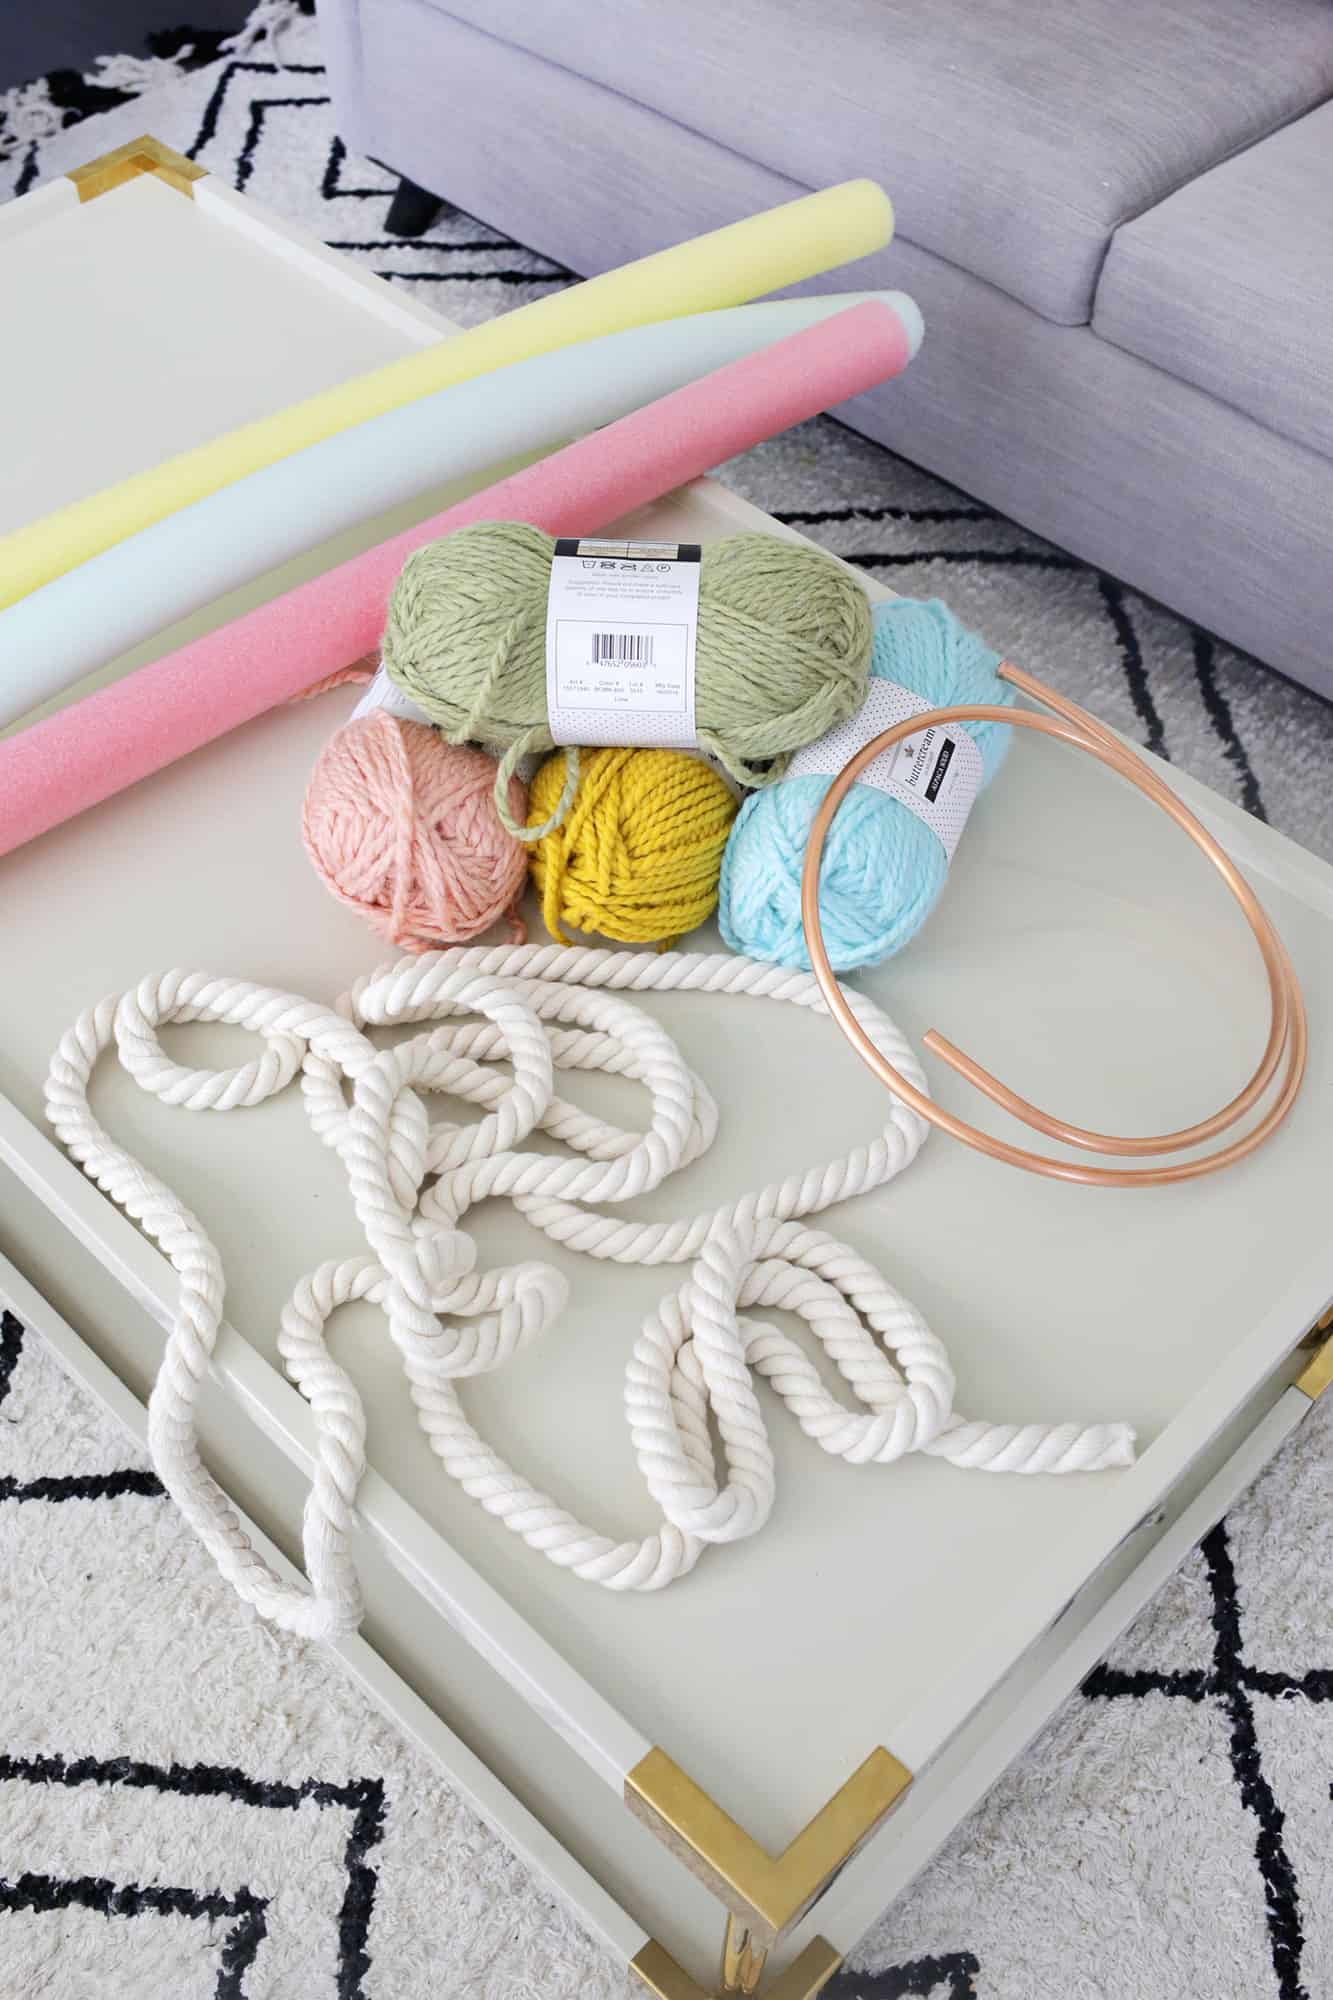
Provides:
–5 pool noodles (did you guess it?)
–thick cotton rope (strive the trim part of your craft/material retailer)
–thick yarn in preferred colors (I didn’t use greater than the yarn you see above, so one massive yarn ought to be sufficient for my dimension)
–hot glue gun
–X-Acto knife and scissors
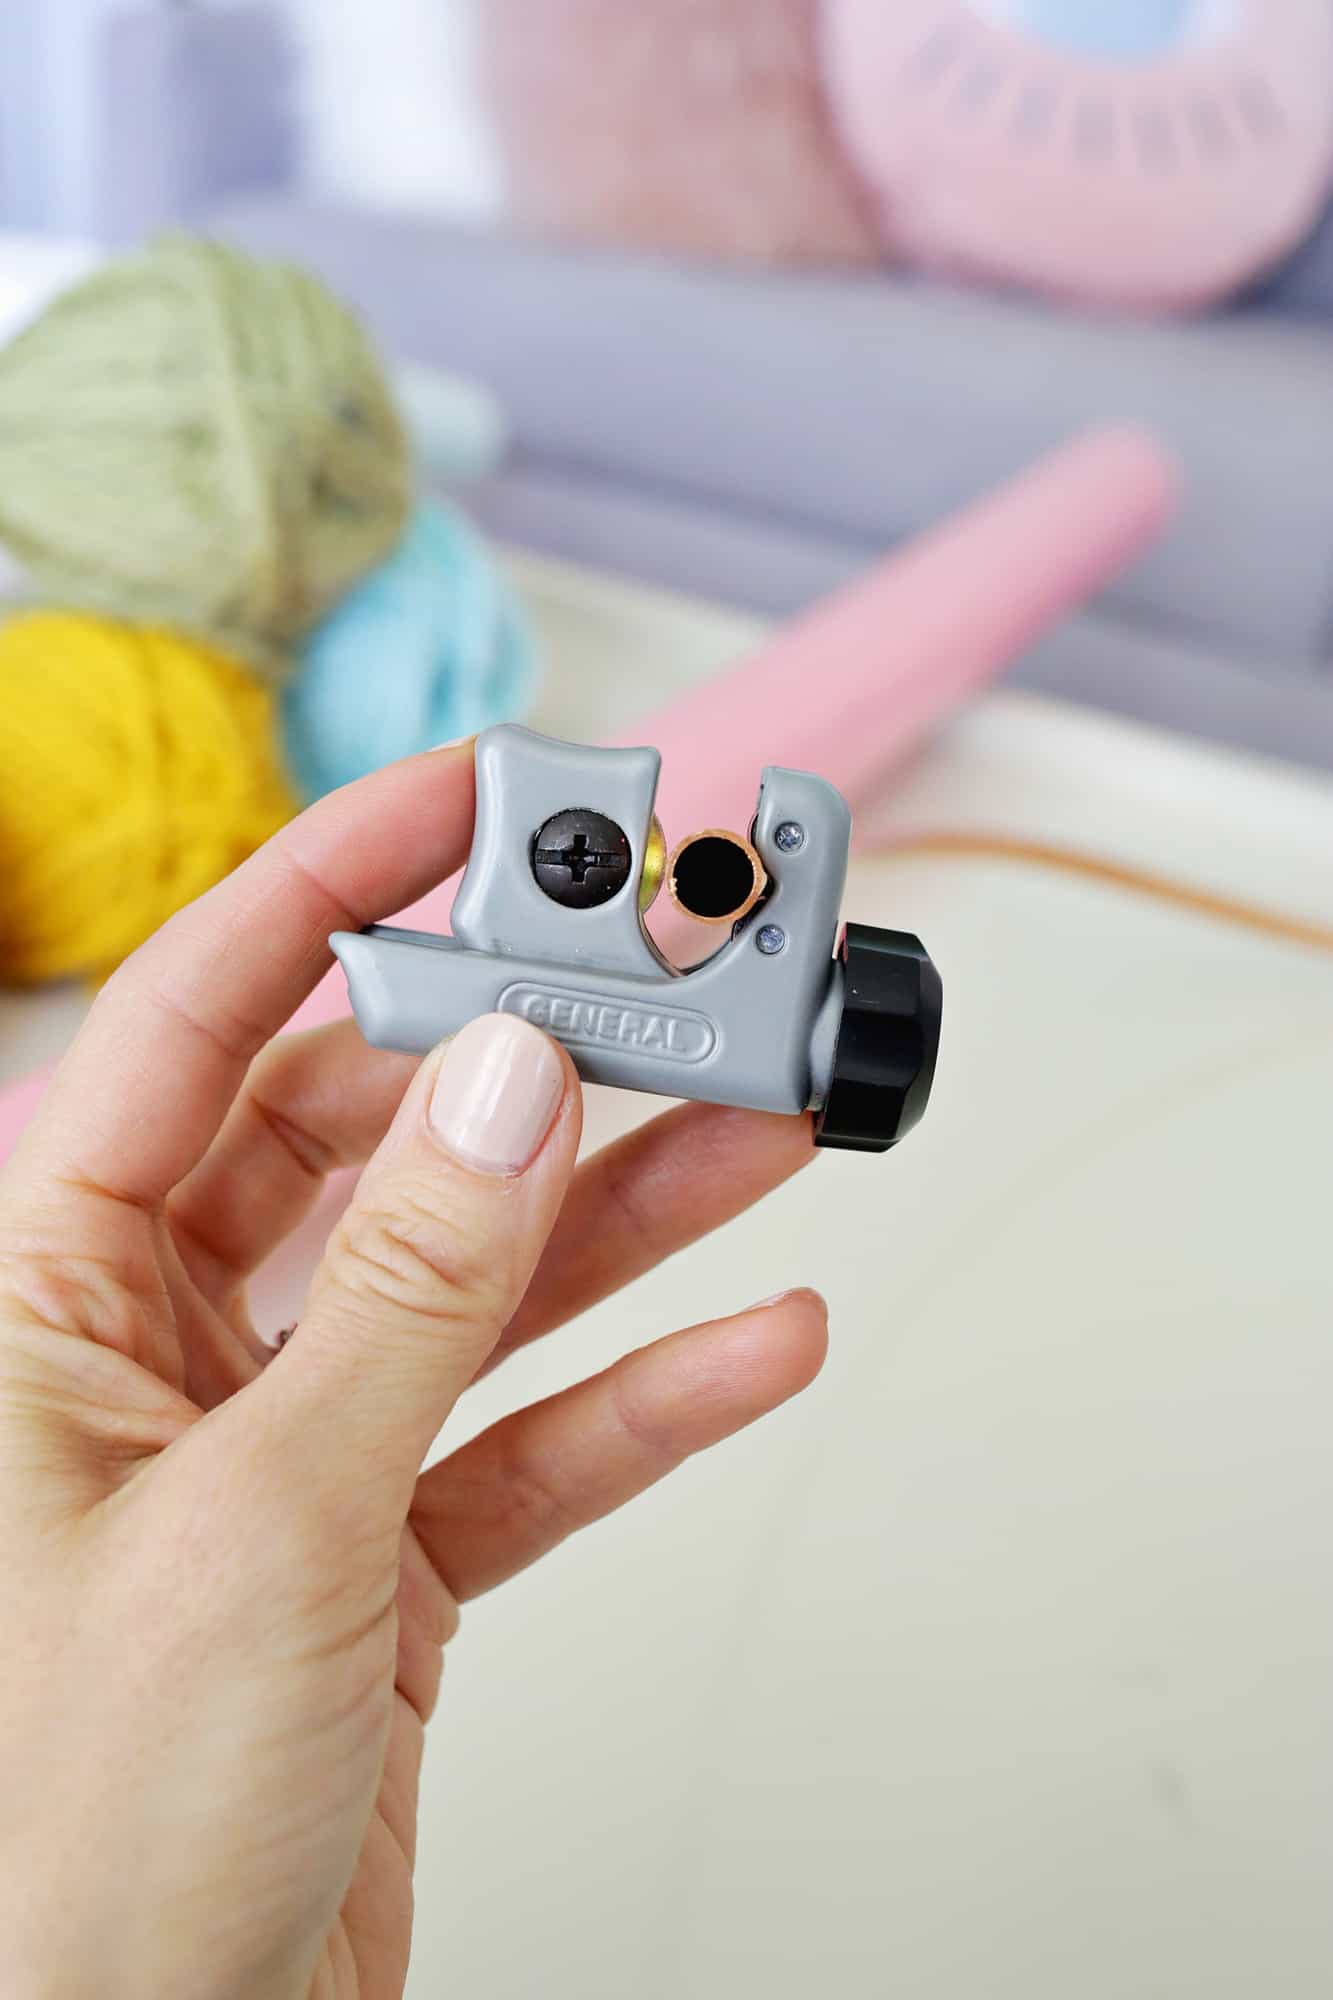
–10′ of 3/8″ copper coil tubing
–mini pipe cutter
–4cm wool felt balls
–cat brush
First, you’re going to determine how lengthy you need your outer rainbow coloration to be, which can decide the general dimension of your rainbow—because it’s the outer layer.
I wished my outer layer to be longer than my pool noodles have been, so I lower off 8″ of one other noodle and scorching glued that part onto the top of one other full size one to provide me an additional lengthy noodle to work with.
Then, I used my pipe cutter to chop a bit of copper coil that was about 2″ shorter than my noodle, so it wouldn’t stick out the ends as soon as I threaded it by means of my noodle.
It took me a bit to determine what to make use of because the spine of the rainbow, as I wanted one thing that will be bendable and but sturdy sufficient to maintain its form as soon as bent.
I keep in mind seeing these copper coils within the ironmongery shop and I assumed they may be value a shot, and so they have been excellent! When you do a a lot bigger rainbow than this, it’s possible you’ll have to strive the coil within the subsequent dimension up.
Will probably be tougher to bend into place, but additionally stronger as nicely as soon as bent into form.

As soon as your pipe is lower, ensure it’s the correct size on your noodle.
Then, use an X-Acto knife to carve out a number of the inside portion of the final 1″ or so of every noodle finish so you might have a bigger area so as to add your rope fringe on the finish. Pool noodles are tremendous simple to chop into, so this half shouldn’t be too arduous.
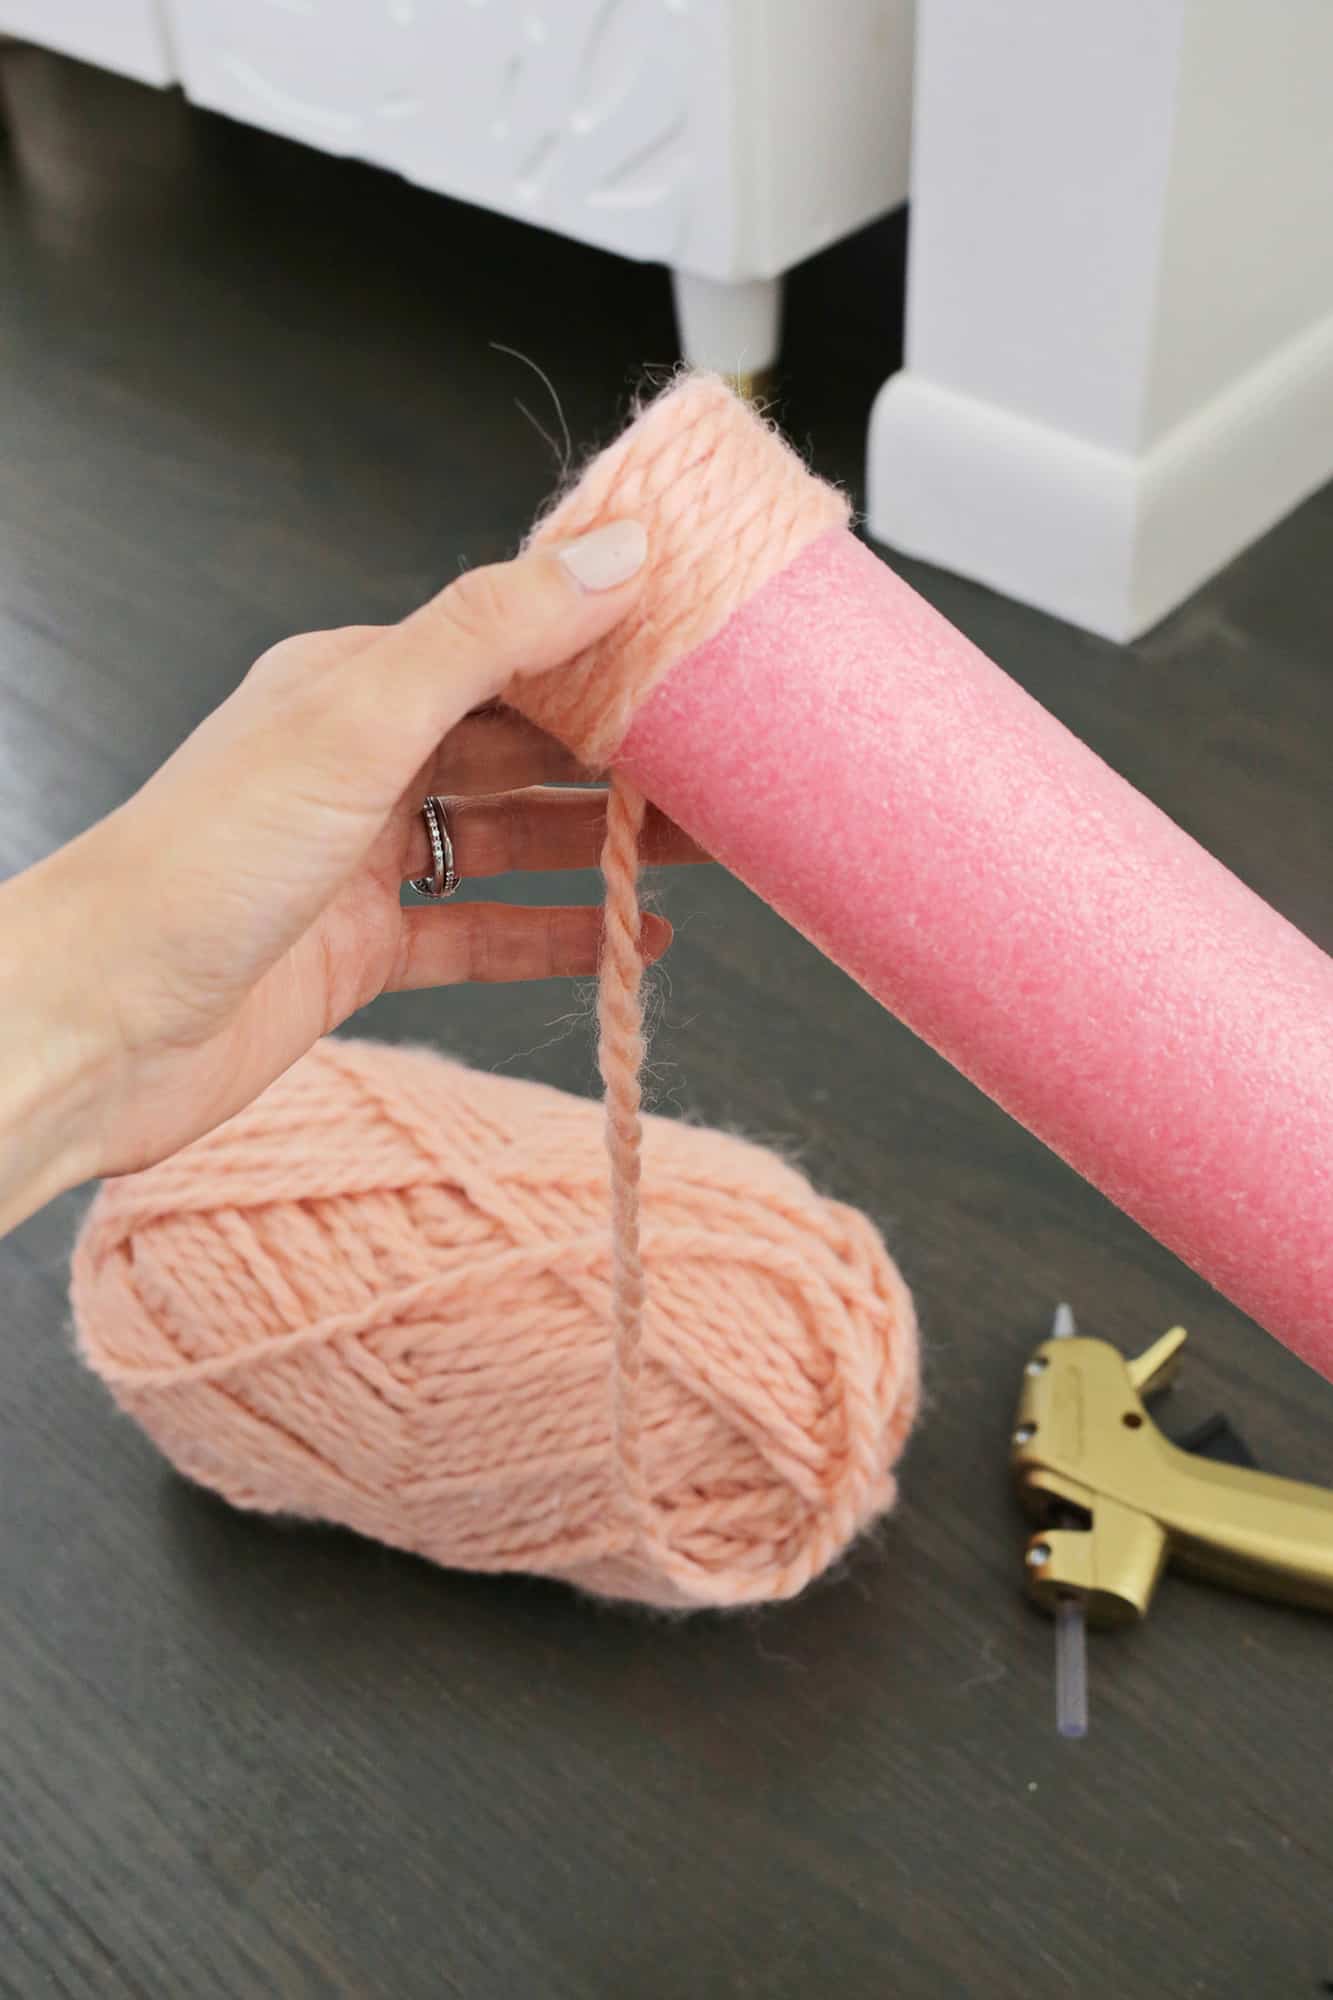
Then, scorching glue your yarn finish to at least one finish of your noodle and begin to (are you prepared for this?) twist the noodle to wrap the yarn across the noodle.
It’s nonetheless time consuming however it’s waaaay simpler to twist the noodle than wrap the yarn across the noodle. Maintain the yarn holding hand in place and use the opposite hand to twist the noodle physique as you go.
I glued my yarn to the correct finish of the noodle and twisted the noodle away from me, however in case you are left handed, it’s possible you’ll need to begin on the left aspect and twist if that’s extra comfy.
Maintain twisting and twisting till you might have about 3″ of yarn-covered noodle after which push all of the yarn downwards in direction of the top you began from to condense the yarn.
Ensure that it’s tremendous tightly filled with no pool noodle beneath in sight—it is going to additionally assist maintain the noodle lined if you bend it right into a rainbow form as nicely if it’s tightly packed yarn.

Maintain twisting and pushing down each 3″ of yarn till you attain the top. I used extra glue to safe the yarn to the noodle on the final 1″ of the noodle after which tucked the top into the noodle opening and glued it in place.
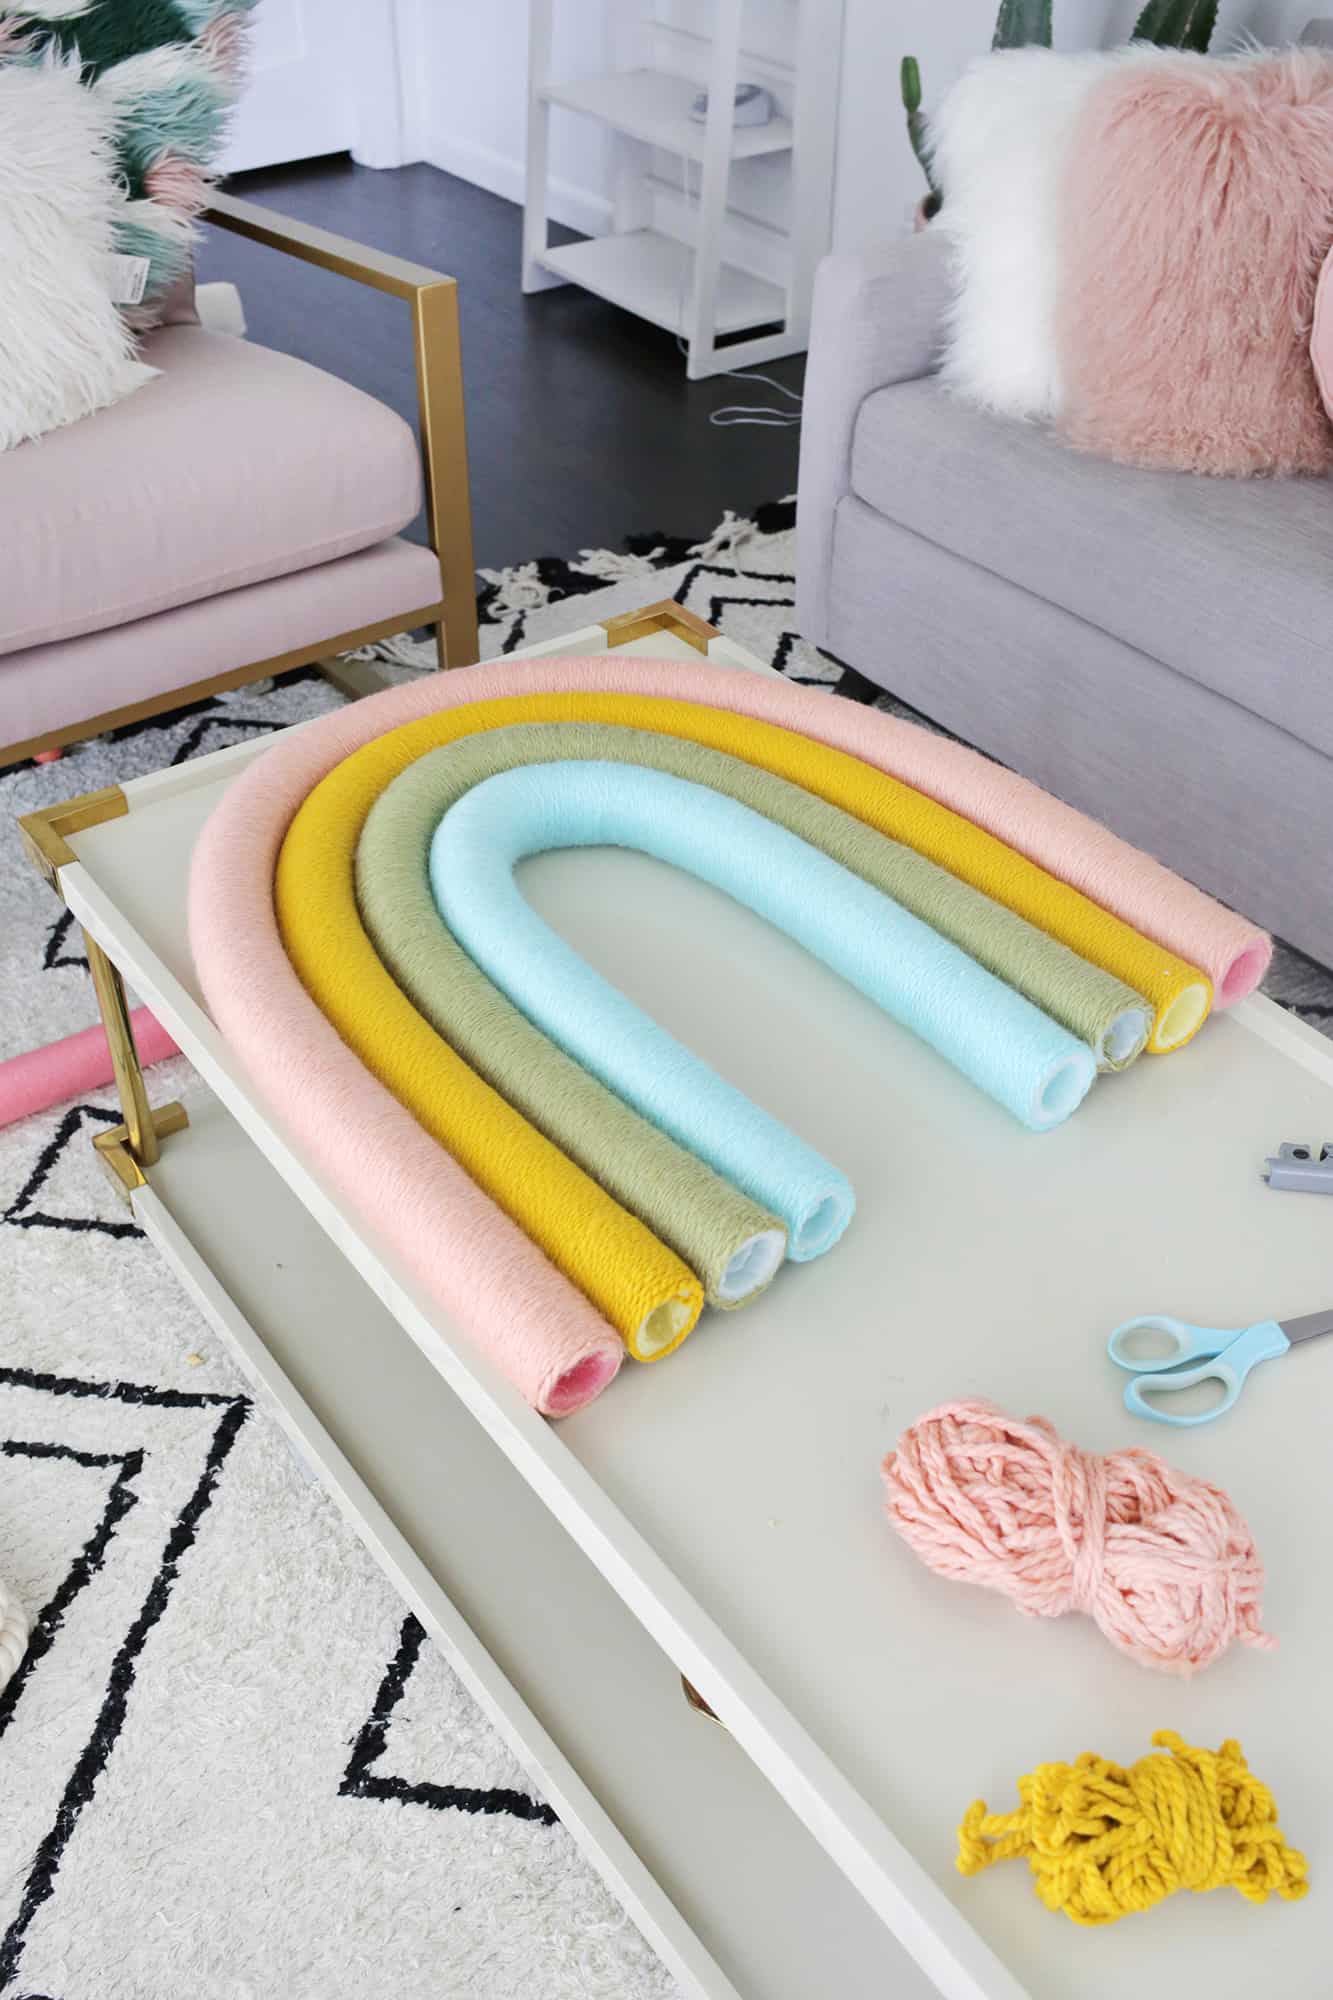
Along with your outer noodle now wrapped, slide in your copper pipe that you simply lower to suit after which bend it into your rainbow form. I made mine a little bit of a taller/skinnier rainbow, however you may do a shorter/wider one as nicely should you like.
As soon as it’s bent into place, ensure your subsequent noodle is lengthy sufficient to suit inside that form and begin to wrap that noodle with the following coloration yarn.
When you find yourself virtually achieved wrapping that noodle, place it again contained in the outer noodle to test the match. Normally including the yarn modifications precisely how a lot noodle size you want, so that you’ll simply need to maintain checking the size earlier than reducing the noodle and ending the top with yarn.
Repeat with every coloration for every noodle till you might have 4 layers! Because you’ll have leftover copper pipe after including it to your outdoors noodle, use the remainder inside one of many inside layers of noodles and that can assist it maintain its form even higher.
That is additionally time to take a bit of yarn the colour of your third layer in and tie it round your pool noodle so you might have a hanger on the bottom to hold your rainbow from.
Principally, if the highest of the rainbow is on the 12:00 place on a clock, tie one finish of a bit of yarn on the 1:00 place and the opposite to the 11:00 place with the knots on the bottom so that you don’t see them and you need to use the yarn that connects the 2 factors as a hanger.
A lot simpler to do it now earlier than you glue issues collectively!
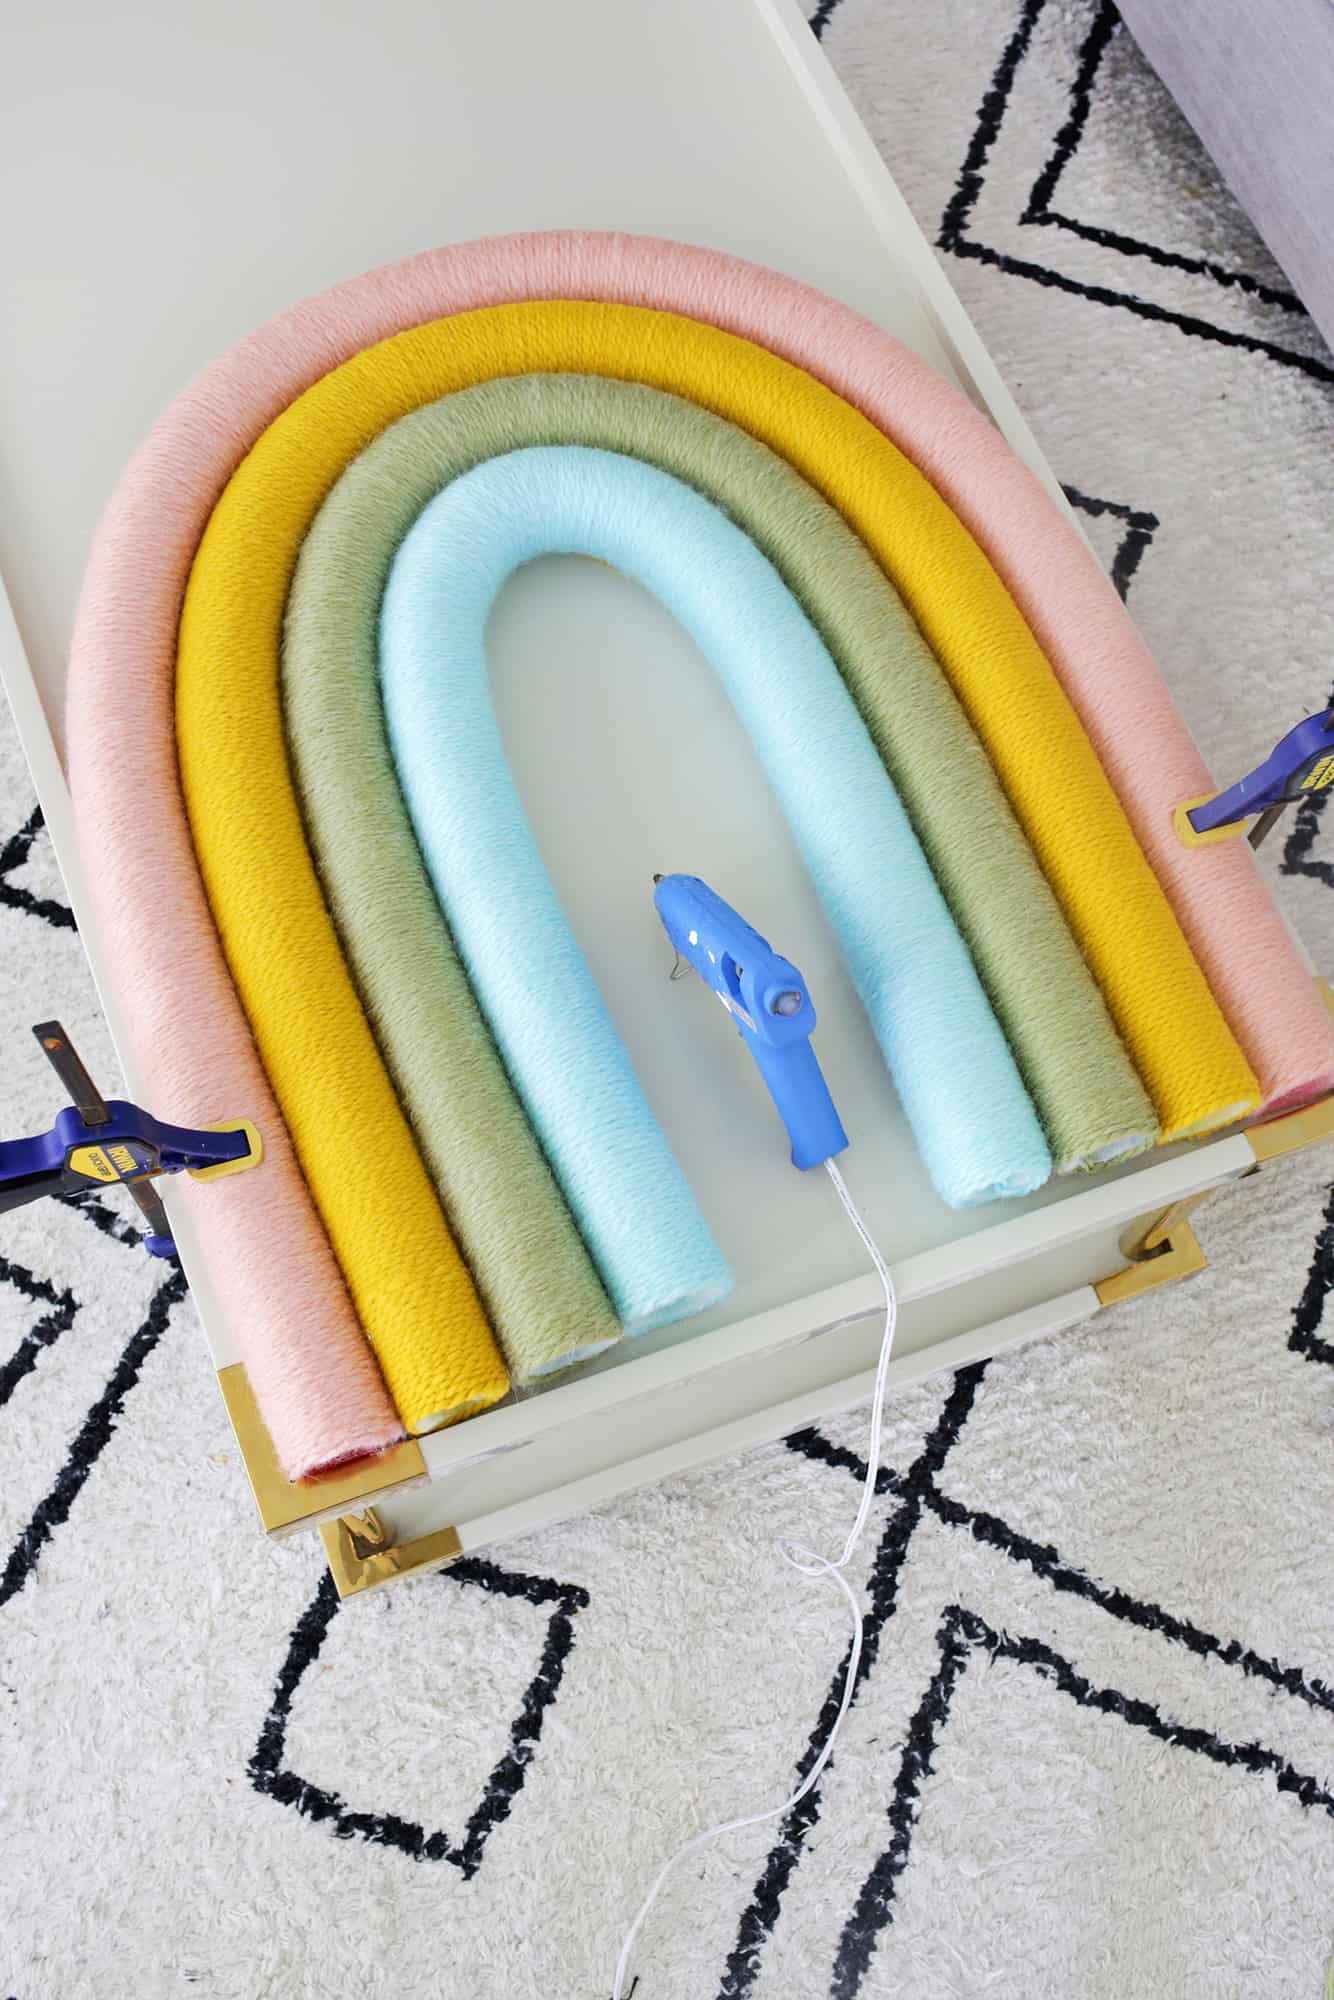
Now it’s time to attach our rainbow collectively! I clamped my outer layer to a espresso desk so it wouldn’t transfer from that place, however you may additionally simply place containers or heavy books on the sides and high/backside to maintain in place when you glue as nicely.
Put a beneficiant quantity of glue on the sides the place every noodle touches the following and add one layer at a time till you might have all of your layers full.
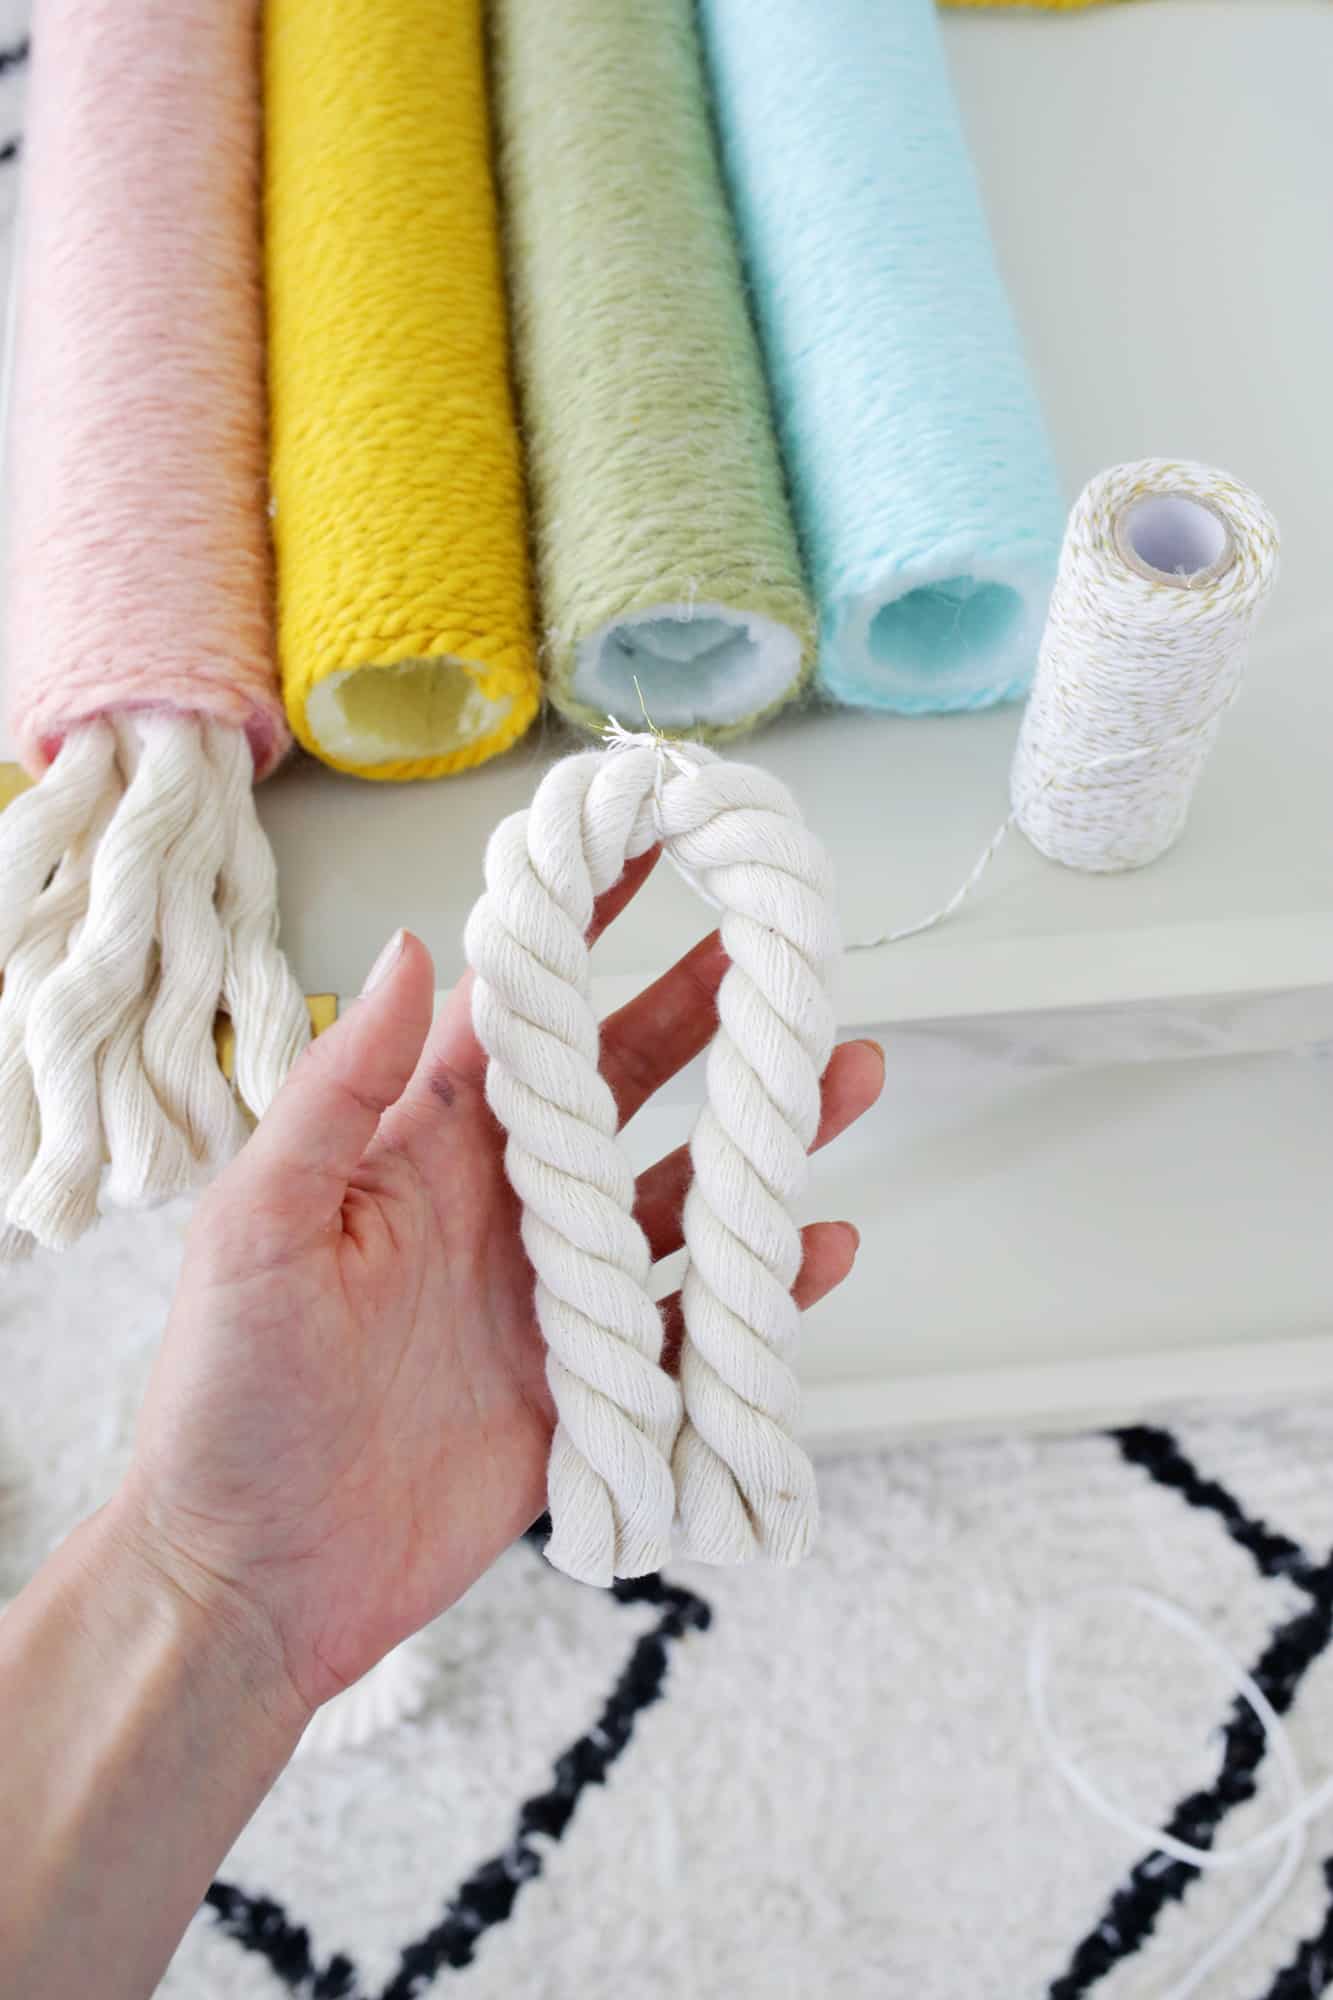
Now that your noodles are connected, take your thick rope, lower it double the size you need your tassel to be, after which tie some twine on the center of the rope to maintain the tassel collectively.
When you can’t discover tremendous thick cotton rope, it’s also possible to lower three or 4 strands double your tassel size and simply tie all of them collectively within the center for a similar impact.
Add some scorching glue into the opening of the noodle and stick within the center fold of your rope so it sticks to the glue.
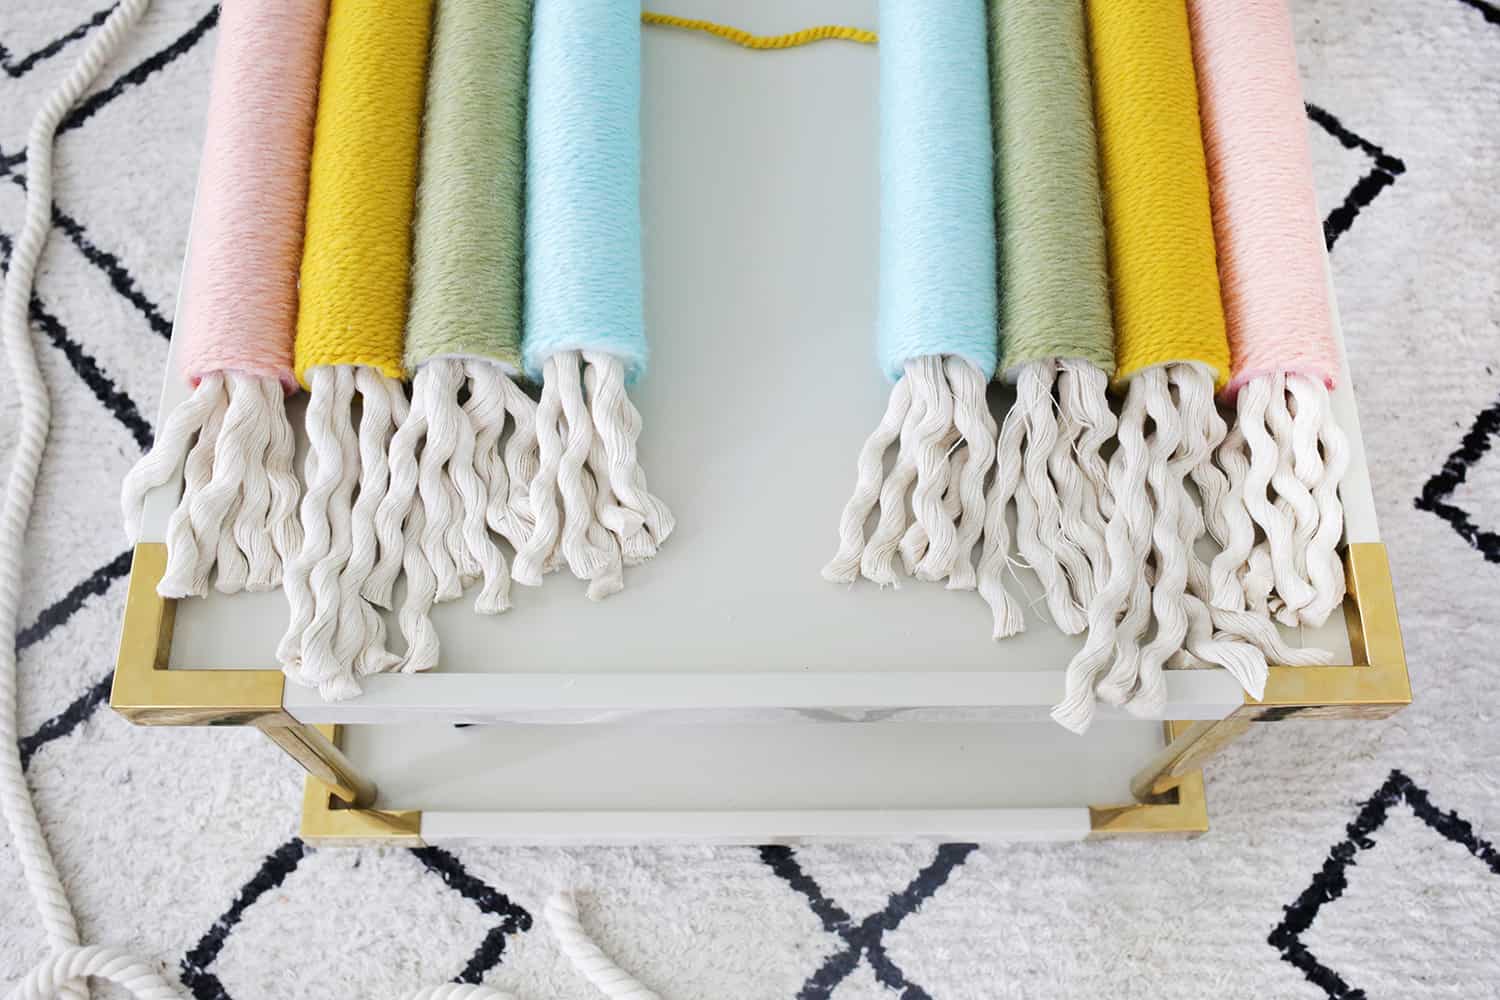
I did various lengths for every noodle, however you are able to do all of them the identical too. Now should you like that curly look when you unwind the rope, you possibly can depart it that approach, or you need to use a pet brush to brush out the rope into one bigger tassel.
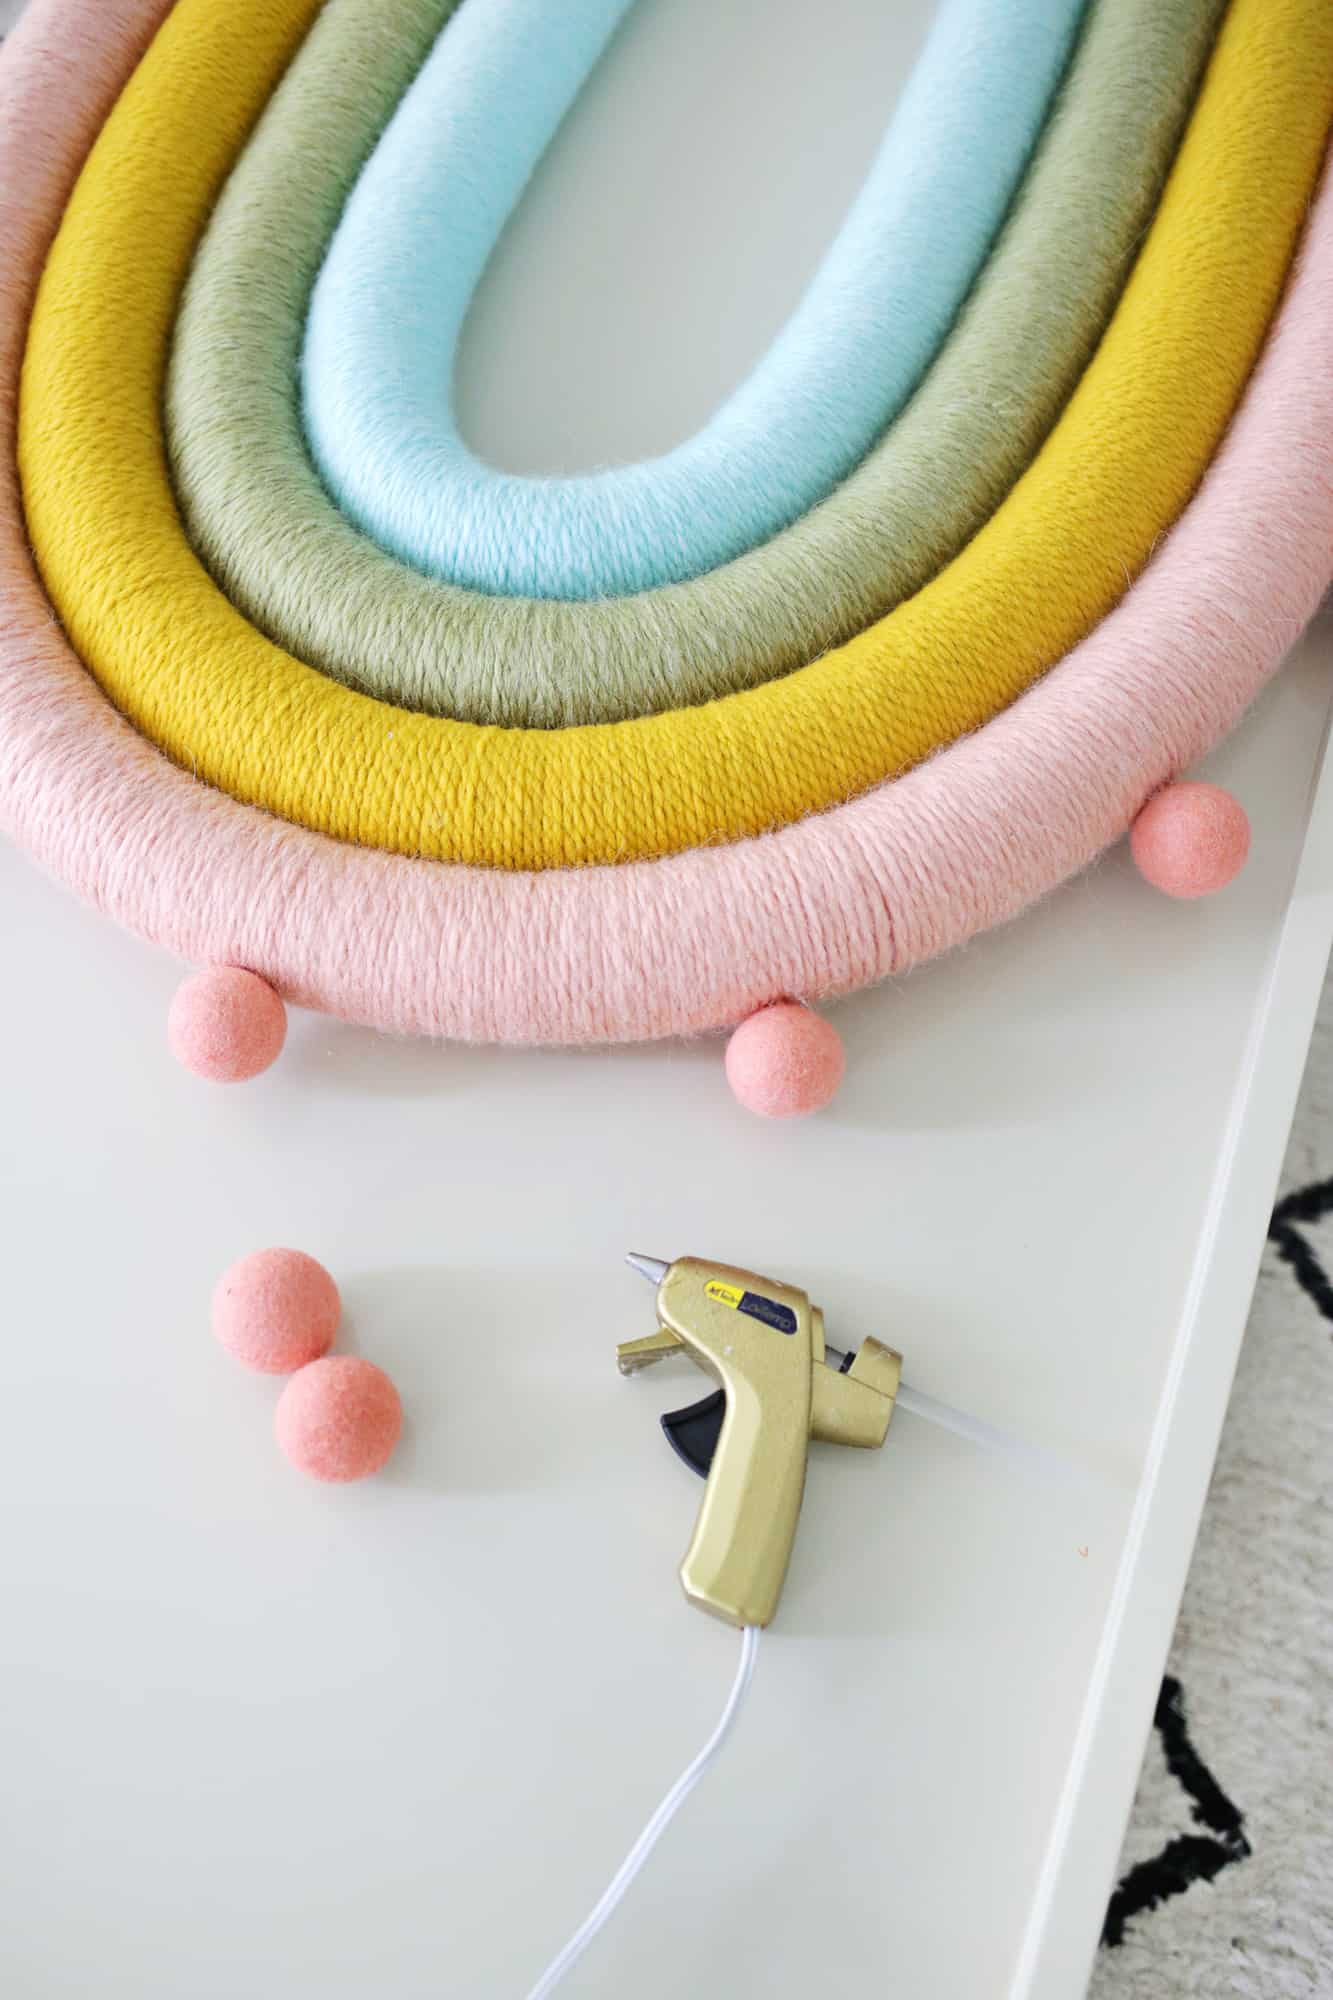 Because the final touch, glue some massive felt balls across the perimeter of the rainbow and your candy little undertaking is able to hold!
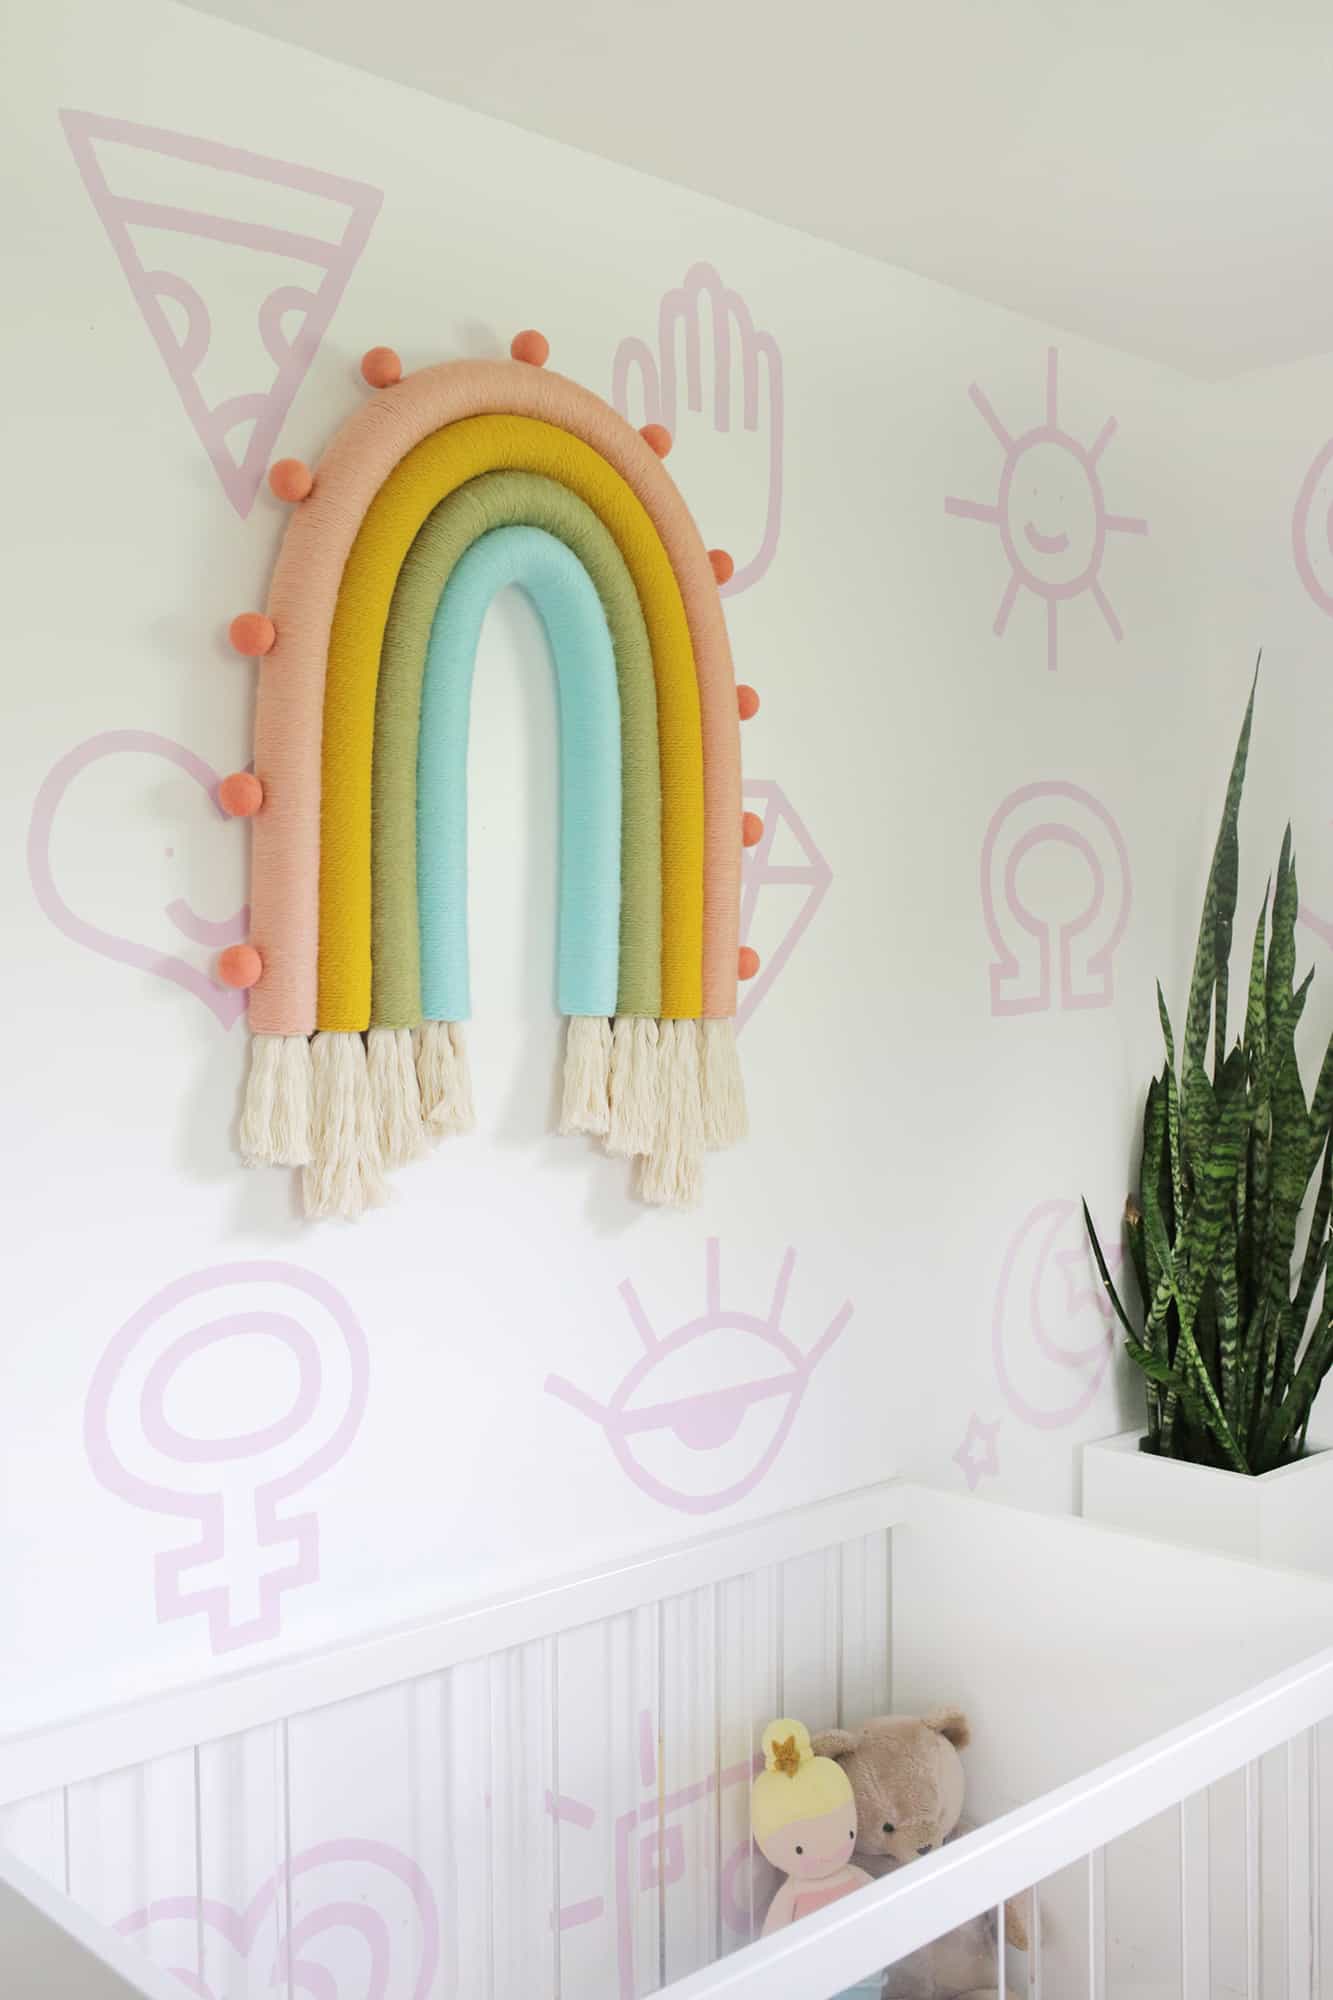
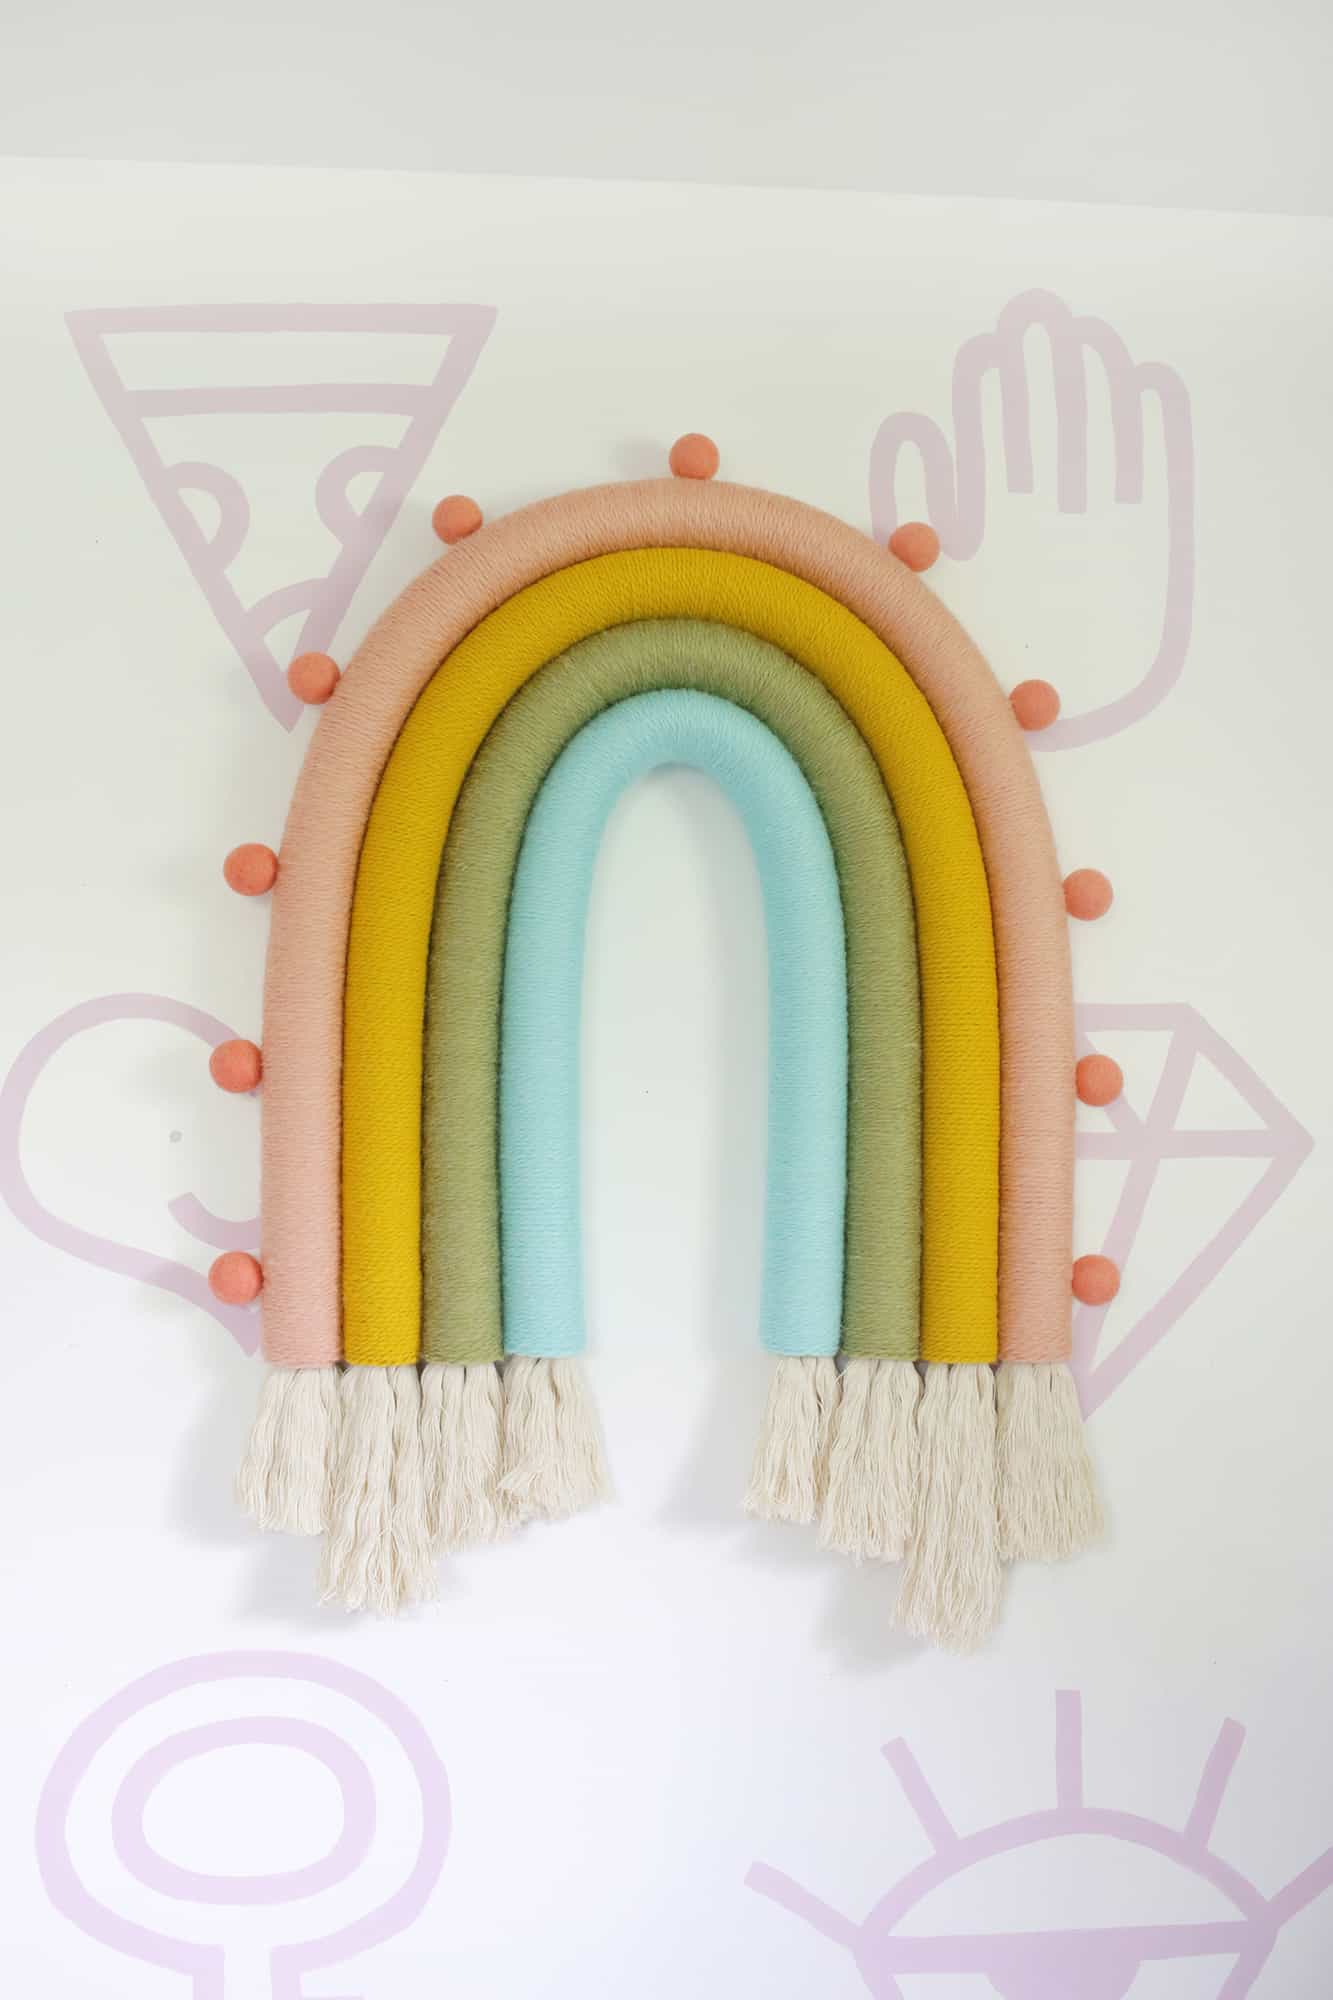
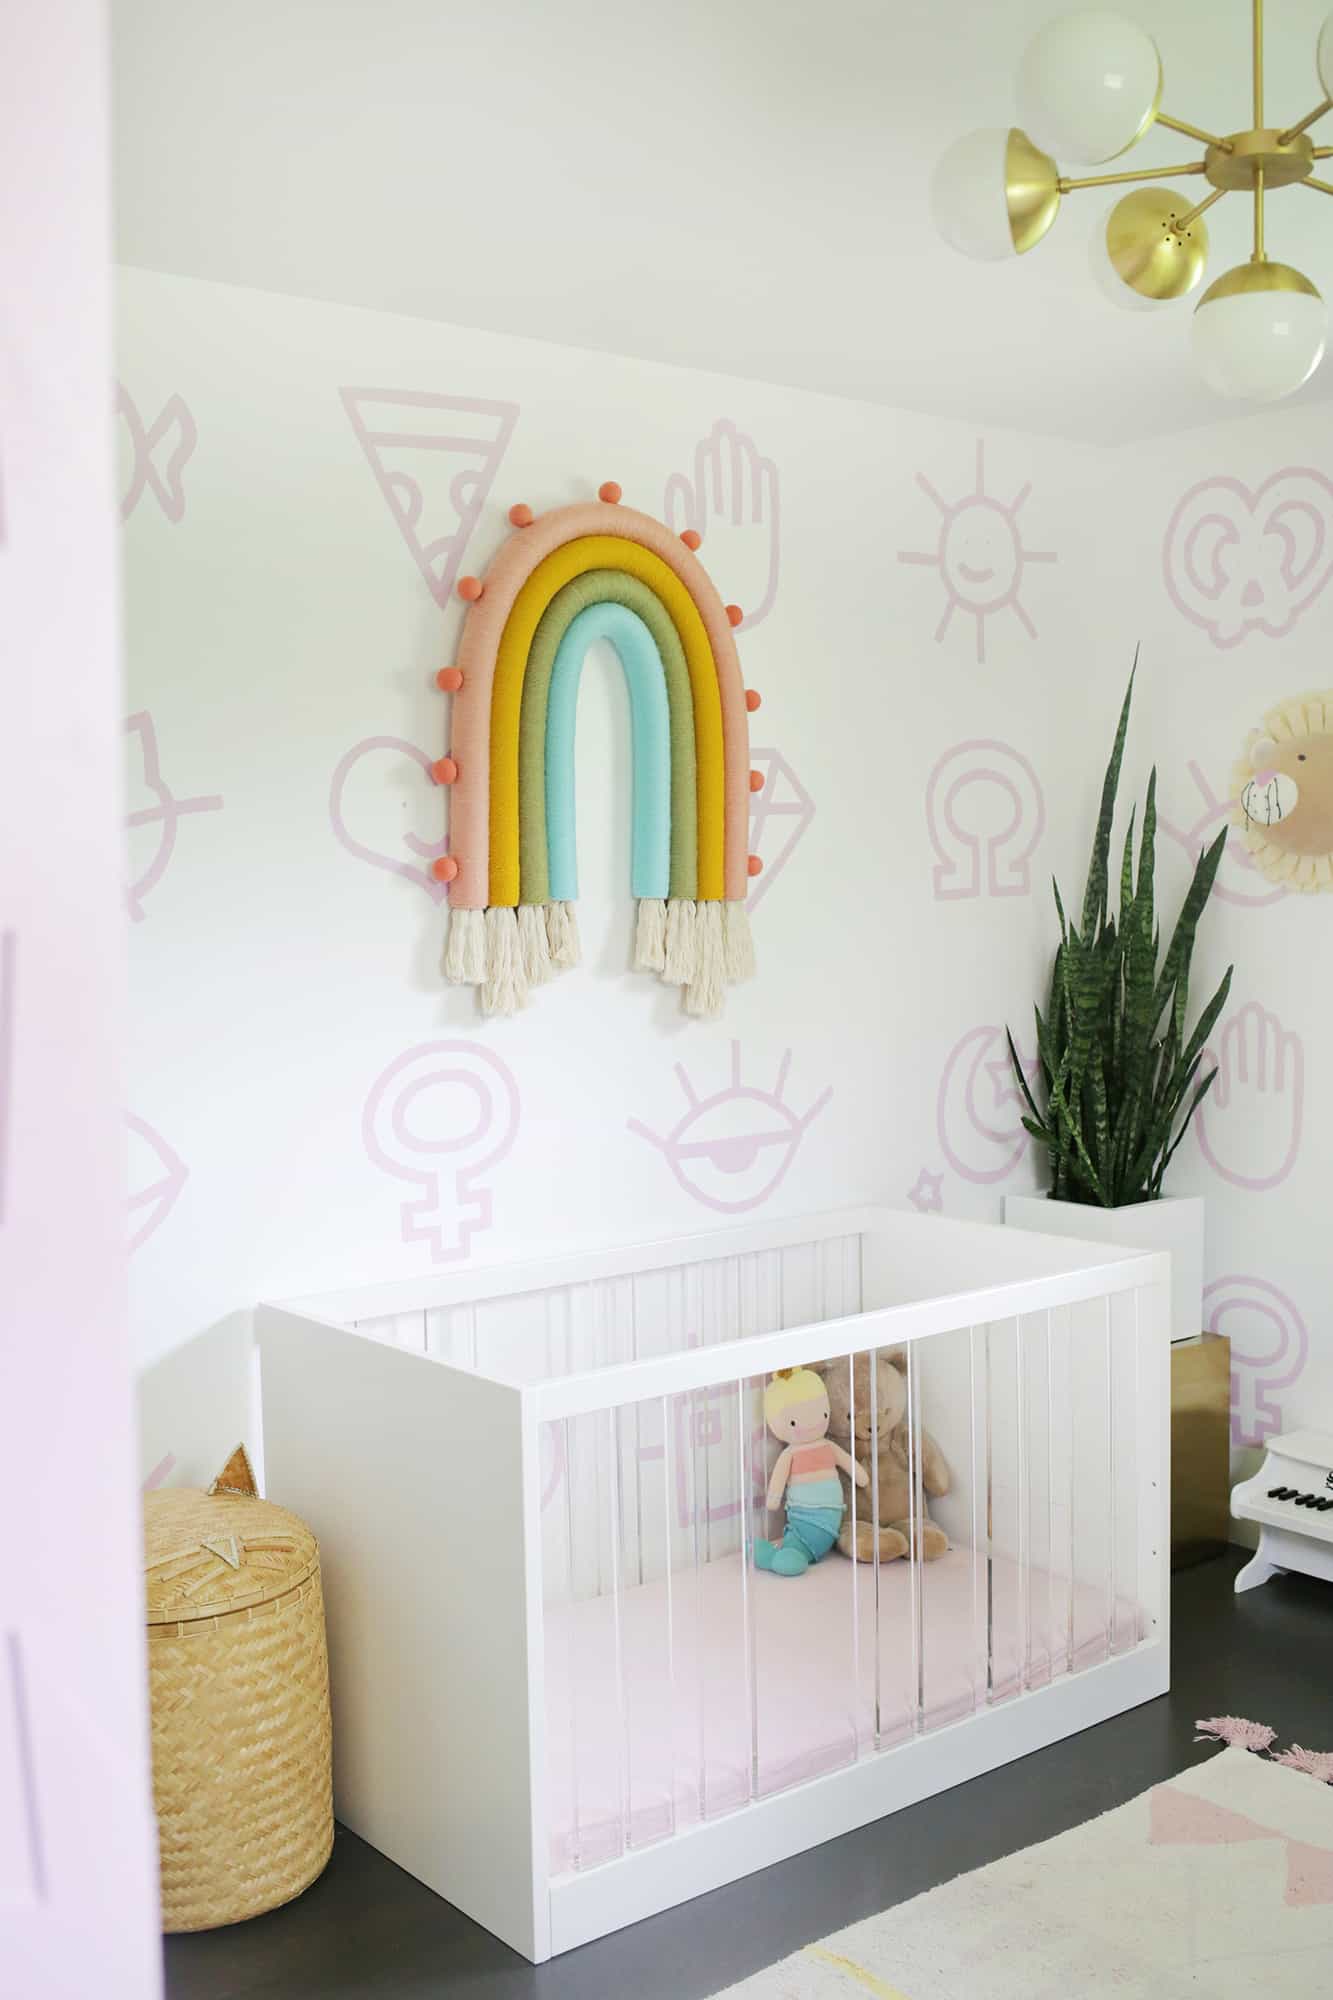 Significantly although, how superb is that!?! I couldn’t be extra happy with how this turned out, and I’ve even been getting in her room simply to take a look at it randomly through the day. It makes me so pleased!
When you love this rainbow wall hanging, ensure to take a look at the corner rainbow I painted in her playroom and our other kid’s projects.
Only a fast security observe: I’m not anxious about Lola reaching this from a security standpoint. She truly performs with these felt balls usually (and so they aren’t a choking hazard dimension for her since they’re bigger) and the remainder of that is simply yarn and pool noodles.
However, should you make this on a smaller scale or simply small felt balls, watch out it doesn’t fall into child’s fingers if there are gadgets connected you’ll fear about them having.
That is completely an merchandise that I’d additionally hold in another room in the home, so don’t really feel like that is restricted to a child’s room should you aren’t in that zone but! xo. Laura
Room Sources: DIY Wallpaper / Chandelier / Similar Crib / Washable Rug
P.S. Love yarn DIYs? Try 20+ of The Cutest Yarn and Textile DIYs!
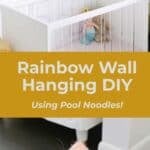
Outsized Rainbow Wall Hanging
How you can make a rainbow wall hanging (utilizing pool noodles!)
-
scorching glue gun
-
X-acto knife
-
-scissors
-
mini pipe cutter
-
OK! So, first you’re going to determine how lengthy you need your outer rainbow coloration to be, which can decide the general dimension of your rainbow—because it’s the outer layer. I wished my outer layer to be longer than my pool noodles have been, so I simply lower off 8″ of one other noodle and scorching glued that part onto the top of one other full size one to provide me an additional lengthy noodle to work with. Then I used my pipe cutter to chop a bit of copper coil that was about 2″ shorter than my noodle so it wouldn’t stick out the ends as soon as I threaded it by means of my noodle. It took me a bit to determine what to make use of because the spine of the rainbow as I wanted one thing that will be bendable and but sturdy sufficient to maintain its form as soon as bent.I keep in mind all the time seeing these copper coils within the ironmongery shop and I assumed they may be value a shot and so they have been excellent! When you do a a lot bigger rainbow than this, it’s possible you’ll have to strive the coil within the subsequent dimension up. Will probably be tougher to bend into place, but additionally stronger as nicely as soon as bent into form.
-
As soon as your pipe is lower, ensure it’s the correct size on your noodle after which use an X-Acto knife to carve out a number of the inside portion of the final 1″ or so of every noodle finish so you might have a bigger area so as to add your rope fringe on the finish. Pool noodles are tremendous simple to chop into, so this half shouldn’t be too arduous.
-
Then, scorching glue your yarn finish to at least one finish of your noodle and begin to (are you prepared for this?) twist the noodle to wrap the yarn across the noodle. It’s nonetheless time consuming however it’s waaaay simpler to twist the noodle than wrap the yarn across the noodle. Maintain the yarn holding hand in place and use the opposite hand to twist the noodle physique as you go. I glued my yarn to the correct finish of the noodle and twisted the noodle away from me, however in case you are left handed it’s possible you’ll need to begin on the left aspect and twist if that’s extra comfy. Maintain twisting and twisting till you might have about 3″ of yarn-covered noodle after which push all of the yarn downwards in direction of the top you began from to condense the yarn and ensure it’s tremendous tightly filled with no pool noodle beneath in sight (it is going to additionally assist maintain the noodle lined if you bend it right into a rainbow form as nicely if it’s tightly packed yarn).
-
Maintain twisting and pushing down each 3″ of yarn till you attain the top. I used extra glue to safe the yarn to the noodle on the final 1″ of the noodle after which tucked the top into the noodle opening and glued it in place.
-
Along with your outer noodle now wrapped, slide in your copper pipe that you simply lower to suit after which bend it into your rainbow form. I made mine a little bit of a taller/skinnier rainbow, however you may do a shorter/wider one as nicely should you like. As soon as it’s bent into place, ensure your subsequent noodle is lengthy sufficient to suit inside that form and begin to wrap that noodle with the following coloration yarn. When you find yourself virtually achieved wrapping that noodle, place it again contained in the outer noodle to test the match.Normally including the yarn modifications precisely how a lot noodle size you want, so that you’ll simply need to maintain checking the size earlier than reducing the noodle and ending the top with yarn.
-
Repeat with every coloration for every noodle till you might have 4 layers! Because you’ll have leftover copper pipe after including it to your outdoors noodle, use the remainder inside one of many inside layers of noodles and that can assist it maintain its form even higher.
-
That is additionally time to take a bit of yarn the colour of your third layer in and tie it round your pool noodle so you might have a hanger on the bottom to hold your rainbow from. Principally, if the highest of the rainbow is on the 12:00 place on a clock, tie one finish of a bit of yarn on the 1:00 place and the opposite to the 11:00 place with the knots on the bottom so that you don’t see them and you need to use the yarn that connects the 2 factors as a hanger. A lot simpler to do it now earlier than you glue issues collectively!
-
Now it’s time to attach our rainbow collectively! I clamped my outer layer to a espresso desk so it wouldn’t transfer from that place, however you may additionally simply place containers or heavy books on the sides and high/backside to maintain in place when you glue as nicely. Simply put a beneficiant quantity of glue on the sides the place every noodle touches the following and add one layer at a time till you might have all of your layers full.
-
Now that your noodles are connected, take your thick rope, lower it double the size you need your tassel to be, after which tie some twine on the center of the rope to maintain the tassel collectively. When you can’t discover tremendous thick cotton rope, it’s also possible to lower three or 4 strands double your tassel size and simply tie all of them collectively within the center for a similar impact. … you need to use a pet brush to brush out the rope into one bigger tassel.
-
Because the final touch, glue some massive felt balls across the perimeter of the rainbow and your candy little undertaking is able to hold!
Only a fast security observe: I’m not anxious about Lola reaching this from a security standpoint. She truly performs with these felt balls usually (and so they aren’t a choking hazard dimension for her since they’re bigger) and the remainder of that is simply yarn and pool noodles. However should you make this on a smaller scale or simply small felt balls, watch out it doesn’t fall into child’s fingers if there are gadgets connected you’ll fear about them having.


