
An awesome, inexperienced various to disposable cling-wrap is beeswax wraps. These DIY reusable beeswax wraps are really easy to make, although generally is a little fiddly at instances, however they work nice.

What are beeswax wraps?
They’re items of cloth which were coated in pure beeswax. They can be moulded into shapes, may be barely sticky and are used to guard meals. They’re additionally reusable, non-toxic and biodegradable which makes them nice to make use of in your house.
As beeswax has pure antibacterial and anti-fungal properties making these wraps breathable and capable of lock in moisture which helps to maintain meals more energizing for longer. And, as pure beeswax is used, you will see that that they’ve a slight scent – of beeswax.
Because of the manner they are often reused a number of instances, not solely are you saving on cash, you might be lowering the quantity of chemical substances in your house and lowering waste.
What’s the perfect material to make use of?
100% cotton, hemp or linen! Natural, pure materials will absorb the beeswax, whereas you will see that that artificial materials are inclined to not take in it as simply, and the beeswax will ultimately freak up and fall off.
The material also needs to be a skinny to medium weight like that of a t-shirt, not too thick like flannel. When you have an previous cotton t-shirt that doesn’t match anymore, then why not reuse that?
Utilizing Reusable Beeswax Wraps
There are numerous methods to make use of these wraps.
- To retailer minimize up fruit and greens, cheese, bread and extra
- Use to cowl bowls, meals storage containers and glass jars as a substitute of utilizing cling wrap (plastic wrap)
- Cowl your proofing baskets and bowls of dough
- I might recommend to not use these with uncooked meat
- As they’re good at sticking to themselves, pinch the sides collectively to create a maintain
- When you discover that they’re feeling a tad stiff, heat them between your palms to make them extra pliable
DIY Reusable Beeswax Wraps
To make these, I attempted two totally different strategies. I discovered the oven technique a lot simpler and faster as I may have two wraps going directly – two cabinets within the oven.

What you will have:
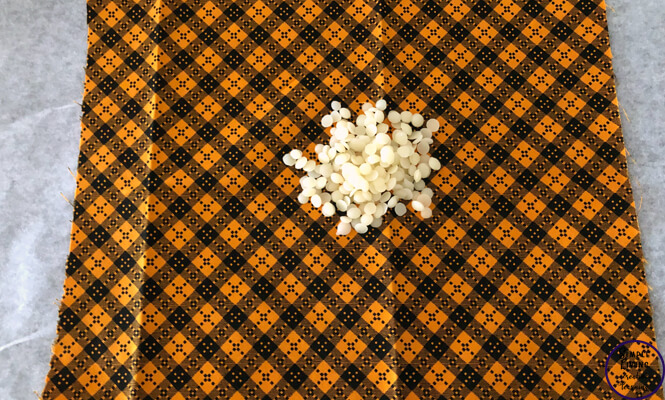
- Beeswax Beads
- Cloth – skinny, cotton material
- Pinking Shears
- Baking Paper
- Paintbrush

Directions for making Reusable Beeswax Wraps
Oven Technique
- Preheat the oven to its lowest setting (100˚C)
- Line a baking tray with baking paper
- With the pinking shears, minimize the material into the styles and sizes that you really want, ensuring they match into throughout the confines of the baking paper on the tray. I made a number of totally different sizes, some rectangle and a few sq.. Utilizing pinking shears for this as a substitute of regular scissors helps to scale back the fraying edges.
- Lay one piece of cloth, flat on the baking paper.
- Sprinkle with the beeswax beads. About 2 TBSP for a 12 x 12 inch (30cm x 30cm) piece of cloth, although it’s best to start out with much less as you may all the time add extra.
- Place the tray within the oven and watch because the beeswax melts, about 5 – 10 minutes.
- As soon as the beeswax has all melted, take away from the oven and utilizing the paintbrush, sweep the wax across the material, ensuring that each one the sides and corners of the material have been saturated in beeswax. You’ll to work quick right here earlier than the wax hardens once more.
- Peel the material off the baking paper and, holding two corners, wave it round within the air for a number of seconds till the wax hardens. Then, grasp over a chair or a bowl to totally dry.
- Repeat till you’ve got used all of your material items.
Iron Technique
- Measure and minimize the material into the styles and sizes that you really want.
- Lay a big sheet of baking paper down in your ironing board. The baking paper must be bigger than the piece of cloth.
- Add beeswax to the center of the material – about 2 TBSP for a 12 x 12 inch (30cm x 30cm) piece of cloth, although it’s best to start out with much less as you may all the time add extra.
- Place a second giant piece of baking paper excessive of the material and beeswax beads.
- Together with your iron on low /wool setting begin working the iron over the beeswax.
- Because the beeswax begins to soften, add light strain whereas transferring the wax in direction of the sides and corners.
- When you want extra beeswax, carry the sides of the highest layer of baking paper and sprinkle on extra.
- As soon as the whole piece of cloth is saturated within the beeswax, shortly carry the highest sheet of baking paper off, seize two corners of the material and peel it off the again baking paper sheet.
- Wave it round within the air for a number of seconds till the wax hardens. Then, grasp over a chair or a bowl to totally dry.
- Repeat till you’ve got used all of your material items.

Notes
- I discovered the oven technique limiting as to the scale I may make the wraps. I may use bigger items of cloth with the iron technique.
- These covers will not be air or water tight. They’re nice for masking leftovers or minimize fruit and greens.
- Hand wash solely in heat, soapy water and grasp to dry.
- Retailer flat, rolled or folded in a cool, dry place.
- They mould higher over bowls when warmed up gently between your palms.
- Don’t use to cowl uncooked meat.
- With correct care, they need to final 6-12 months, although if the beeswax seems to be like it’s beginning to flake, you would repeat the method above on the identical piece of cloth or begin once more from scratch with new material.
Different Stitching Initiatives
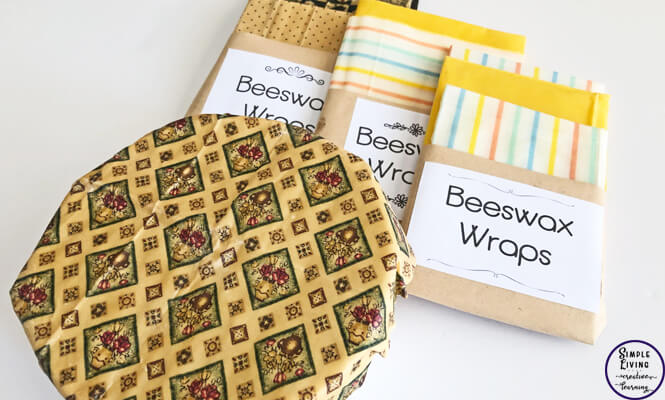
I created the white labels that you may see on the pictures. I printed them out on white sticky paper after which minimize to measurement earlier than inserting them onto the brown paper. You may get a duplicate of those labels, totally free, by signing up beneath:

DIY Reusable Beeswax Wraps
An awesome, inexperienced various to disposable cling-wrap is beeswax wraps. They’re really easy to make, although generally is a little fiddly at instances, however they work nice.
Gear
-
Pinking Shears
-
Baking paper
-
Paintbrush
Provides
- Beeswax Beads
- Cloth skinny – cotton, linen or hemp
Directions
Oven Technique
-
Preheat the oven to its lowest setting (100˚C).
-
Line a baking tray with baking paper.
-
With the pinking shears, minimize the material into the styles and sizes that you really want, ensuring they match into throughout the confines of the baking paper on the tray.I made a number of totally different sizes, some rectangle and a few sq.. Utilizing pinking shears for this as a substitute of regular scissors helps to scale back the fraying edges.
-
Lay one piece of cloth, flat on the baking paper.
-
Sprinkle with the beeswax beads. About 2 TBSP for a 12 x 12 inch (30cm x 30cm) piece of cloth, although it’s best to start out with much less as you may all the time add extra.
-
Place the tray within the oven and watch because the beeswax melts, about 5 – 10 minutes.
-
As soon as the beeswax has all melted, take away from the oven and utilizing the paintbrush, sweep the wax across the material, ensuring that each one the sides and corners of the material have been saturated in beeswax. You’ll to work quick right here earlier than the wax hardens once more.
-
Peel the material off the baking paper and, holding two corners, wave it round within the air for a number of seconds till the wax hardens.
-
Then, grasp over a chair or a bowl to totally dry.
-
Repeat till you’ve got used all of your material items.
Iron Technique
-
Measure and minimize the material into the styles and sizes that you really want.
-
Lay a big sheet of baking paper down in your ironing board. The baking paper must be bigger than the piece of cloth.
-
Add beeswax to the center of the material – about 2 TBSP for a 12 x 12 inch (30cm x 30cm) piece of cloth, although it’s best to start out with much less as you may all the time add extra.
-
Place a second giant piece of baking paper excessive of the material and beeswax beads.
-
Together with your iron on low /wool setting begin working the iron over the beeswax.Because the beeswax begins to soften, add light strain whereas transferring the wax in direction of the sides and corners.When you want extra beeswax, carry the sides of the highest layer of baking paper and sprinkle on extra.
-
As soon as the whole piece of cloth is saturated within the beeswax, shortly carry the highest sheet of baking paper off, seize two corners of the material and peel it off the again baking paper sheet.
-
Wave it round within the air for a number of seconds till the wax hardens. Then, grasp over a chair or a bowl to totally dry.
-
Repeat till you’ve got used all of your material items.


 Feel-Good Films I Love (having premiered in the past 10 years) – The Simply Luxurious Life®")


